
WetLab Laboratory Logbook
A searchable chronological record of experimental work imported from Log book 2026.docx.
- Records
- 82
- Months
- 4
- Tables
- 13
- Figures
- 1
Source: Log book 2026.docx · Coverage: May 2026 to August 2026
Showing 82 of 82 records
Experimental record
Review the imported titles, dates, methods, results, tables and figures before export.
01 Month group
May 2026
- Records
- 12
- Tables
- 1
- Figures
- 0
Record 01 Preparation of Medium and Antibiotics Stock MaterialsMethod
Equipment
- LB (broth) powder
- LB agar powder
- Ampicillin
- MiniQ water
Agar preparation procedure
- Measure 18g of LB agar powder and 500mL of MiniQ water.
- Add 18g LB agar powder to 500mL MiniQ and mix thoroughly.
LB broth preparation procedure
- Measure 21g of LB agar powder and 1000mL of MiniQ water.
- Add 21g LB agar powder to 1000mL MiniQ and mix thoroughly.
Preparation of Ampicillin stock solution
- Measure 1g ampicillin sodium salt and 10mL of MiniQ water. (0.1g/mL)
- Add 1g ampicillin powder to 10mL MiniQ and mix thoroughly.
- Store at -20°C
Preparation of Kanamycin stock solution
- Measure 0.5g kanamycin sodium salt and 10mL of MiniQ water. (0.5g/mL)
- Add 0.5g kanamycin powder to 10mL MiniQ and mix thoroughly.
- Store at -20°C
Preparation of LB agar gel plate with Ampicillin
- Add 50μL ampicillin stock solution to 50mL molten agar, cooled to approximately 50°C and poured into Petri dishes.
- A sterile wire loop was used to pick E.coli pET-ptb:buk cells from the stock culture for bacterial streaking.
- Incubated at 37°C overnight.
Preparation of LB agar gel plate with Kanamycin
- Add 50μL kanamycin stock solution to 50mL molten agar, cooled to approximately 50°C and poured into Petri dishes.
- A sterile wire loop was used to pick E.coli pET28a-rev(pNorVb>GFP:NorR:double terminator B 0015) cells from the stock culture for bacterial streaking.
- Incubated at 37°C overnight.
- Collected 250ml of EcN and 100ml each of [2]pET28a-pNorVb-EGFP and [3]pET-T7-PTB-BUK
Record 02 Midi of [2]&[3] MaterialsMethod
Equipment
- [2]pET28a-pNorVb-EGFP plasmid-containing bacterial strain
- [3]pET-T7-PTB-BUK plasmid-containing bacterial strain
- NucleoBond® Xtra Midi Plus
- Isopropanol
- Ethanol
- Dd H2O
Procedure
- Inoculate 5mL starter culture of LB medium with a single colony picked from a freshly streaked agar plate.
- Shake at 37C and 300 rpm for 8h.
- Inoculate an overnight culture by diluting the starter culture 1/1000 into the given volumes of LB medium also containing the appropriate selective antibiotic.
- Grow the culture overnight at 37 °C and - 300 rpm for 12-16 h.
- Pellet 100 ml bacterial culture by centrifugation for 15 mins at 4500 x g.
- Discard the supernatant, and resuspend the bacteria by adding 8mL buffer RES + RNase A. (4 ml to each 50 ml tube). Use a vortex to resuspend the pellet.
- Check Buffer LYS for white precipitate. If present, warm the buffer for several minutes at 30-40 °C until the precipitate is dissolved completely. Cool buffer down to room temperature.
- Add 8 mL Buffer LYS to the samples.
- Mix gently by inverting the tube 5 times. Do not vortex.
- Incubate the mixture at room temperature for 5 min.
- Apply 12 mL Buffer EQU onto the rim of the column filter to make sure the filter is completely wet.
- Allow column to empty by gravity flow using 15mL conical tube as support (column does not run dry)
- Add 8mL Buffer NEU to the samples.
- Immediately invert the tube gently until blue samples turn colourless completely. Do not vortex(off-white flocculate present is normal)
- Invert the tube 3 times directly before applying the lysate to the Column Filter
- The lysate is simultaneously cleared and loaded onto the column. Refill the filter if more lysate has to be loaded than the filter is able to hold. Allow the column to empty by gravity flow.
- Wash the Column Filter and Column by applying 5 mL Buffer EQU to the rim of the filter.
- Discard the WHITE filter and wash the TRANSPARENT column by adding an 8mL Buffer WASH.
- Elute the plasmid DNA with 5mL Buffer ELU. (Use a new tube. We need this fluid, do not discard the flow out)
- Add 2ml room-temperature isopropanol to precipitate the eluted plasmid DNA and vortex until solution is uniform.
- Centrifuge at 4,500 x g for 20 min at 4C. Carefully discard the supernatant.
- Add 2 ml 70% ethanol, centrifuge at 4500 x g for 5 min. Remove all ethanol (use pipette).
- Wait for ethanol to evaporate (~1hr).
- Add 80 μl ddH2O to the DNA pellet and resuspend it.
- Use nano drop (inject 1 μL sample to machine) to test the concentration of the DNA.
Concentration
- [2]pET28a-pNorVb-EGFP 0.2373 μg/μl (failed)
- [3]pET-T7-PTB-BUK 230.9 μg/μl (successful)
Record 03 Competent cells EcN MaterialsMethod1 table
Equipment
- Overnight EcN
- LB broth
- Calcium chloride solution (15mM)
- Calcium chloride solution with 15% glycerol
- Ice
Procedure
- Place 100mL Calcium chloride solution (15mM) and 100mL Calcium chloride solution with 15% glycerol on ice.
- Transfer 5mL of overnight BL21 into 500mL of LB broth and incubate at 220 rpm until OD600 rises to 0.5-0.6. (~10:00am)
| Time (24hr) | OD600 |
|---|---|
| 11:00 | 0.025 |
| 12:00 | 0.100 |
| 12:30 | 0.215 |
| 13:00 | 0.365 |
| 13:30 | 0.556 |
- Transfer the Overnight cell to two 250mL centrifuge tubes.
- Tare and weigh the two 250mL centrifuge tubes until they have less than 1% difference by mass.
- Centrifuge the culture at 4,000 x g for 5 minutes at 4 °C
- Carefully decant and discard the supernatant.
- Gently resuspend the cell pellet with 10 mL of cold, sterile 100 mM calcium chloride (CaCl2) solution.
- Place the two 250mL centrifuge tubes in ice for 30 minutes
- Centrifuge the tubes at 4,000 x g for 5 minutes at 4 °C
- Carefully decant and discard the supernatant.
- Gently resuspend the cell pellet with 10 mL of cold, sterile calcium chloride and 15% glycerol solution.
- Divide the competent cells into small aliquots (100 μl each) and pipette them in sterile microcentrifuge tubes.
- Flash-freeze the aliquots in liquid nitrogen and store them at -80 °C until needed.
Record 04 Preparation of Kanamycin and Ampicilin Plate MaterialsMethod
Equipment
- Plate
- Kanamycin stock solution
- Alcohol lamp
- [6]pET28a-pchA-PpchA-PLEE1-EGFP BL21 glycerol stock
- [7]pET28a-T7-HBD-CRT-TER BL21 glycerol stock
Procedure
LB Agar gel with Kanamycin(plate) preparation procedure
- Measure 200μL of Kanamycin stock and 200mL of agar gel liquid solution.
- Add 200μL of ampicillin to 200mL of agar gel solution. (Ratio of antibiotics to solution is 1:1000)
- Mix the solution and add it to the plate.
Streaking [6] [7] on an LB Agar gel plate procedure
- Sterilize the wire loop.
- Dip the sterile loop into BL21 stock to collect samples.
- Insert the loop in the plate and streak the plate with it.
- Put the plate upside down into a 37℃ incubator.
Record 05 Plasmid Transformation of [3] MaterialsMethod
Equipment
- [3]pET-T7-PTB-BUK DNA (230.9 μg/μl)
- LB agar plate with Kanamycin
- Ice
- LB broth
- Competent cell (EcN)
Procedure
- Add 1 μL of plasmid to the cells. Pipette gently. DO NOT vortex.
- Place mixture on ice for 20 minutes.
- Heat shock the mixture at 42°C for 1 minute.
- Place the mixture on ice for 2 minutes.
- Add 900μL of LB broth to the mixture. Pipette gently to mix.
- Incubate the mixture at 37°C for 1 hour. Shake at 300 rpm.
- Centrifuge at 4°C 4.5rpm for 5min
- Remove supernatant
- Resuspend cell pellet
- Add 50μL of mixture to 1 plate (50μL each). Spread evenly.
- Collect the cells using centrifugation and remove 700μL of LB. Do not remove the cells.
- Pipette gently to mix. Add 100 μL of mixture to each plate (it is 4.5x concentration). Streak the plate.
- Incubate the plates overnight at 37°C. If it is not immediately used, store in 4°C refrigerator.
Record 06 Midi of [2][6][7] MaterialsMethod
Equipment
- NucleoBond® Xtra Midi Plus
- Isopropanol
- Ethanol
- Dd H2O
- [2]pET28a-pNorVb-EGFP plasmid-containing bacterial strain
- [6]pET28a-pchA-PpchA-PLEE1-EGFP plasmid-containing bacterial strain
- [7]pET28a-T7-HBD-CRT-TER plasmid-containing bacterial strain
Procedure
- Inoculate 5mL starter culture of LB medium with a single colony picked from a freshly streaked agar plate.
- Shake at 37C and 300 rpm for 8h.
- Inoculate an overnight culture by diluting the starter culture 1/1000 into the given volumes of LB medium also containing the appropriate selective antibiotic.
- Grow the culture overnight at 37 °C and - 300 rpm for 12-16 h.
- Pellet 100 ml bacterial culture by centrifugation for 15 mins at 4500 x g.
- Discard the supernatant, and resuspend the bacteria by adding 8mL buffer RES + RNase A. (4 ml to each 50 ml tube). Use a vortex to resuspend the pellet.
- Check Buffer LYS for white precipitate. If present, warm the buffer for several minutes at 30-40 °C until the precipitate is dissolved completely. Cool buffer down to room temperature.
- Add 8 mL Buffer LYS to the samples.
- Mix gently by inverting the tube 5 times. Do not vortex.
- Incubate the mixture at room temperature for 5 min.
- Apply 12 mL Buffer EQU onto the rim of the column filter to make sure the filter is completely wet.
- Allow column to empty by gravity flow using 15mL conical tube as support (column does not run dry)
- Add 8mL Buffer NEU to the samples.
- Immediately invert the tube gently until blue samples turn colourless completely. Do not vortex(off-white flocculate present is normal)
- Invert the tube 3 times directly before applying the lysate to the Column Filter
- The lysate is simultaneously cleared and loaded onto the column. Refill the filter if more lysate has to be loaded than the filter is able to hold. Allow the column to empty by gravity flow.
- Wash the Column Filter and Column by applying 5 mL Buffer EQU to the rim of the filter.
- Discard the WHITE filter and wash the TRANSPARENT column by adding an 8mL Buffer WASH.
- Elute the plasmid DNA with 5mL Buffer ELU. (Use a new tube. We need this fluid, do not discard the flow out)
- Add 2ml room-temperature isopropanol to precipitate the eluted plasmid DNA and vortex until solution is uniform.
- Centrifuge at 4,500 x g for 20 min at 4C. Carefully discard the supernatant.
- Add 2 ml 70% ethanol, centrifuge at 4500 x g for 5 min. Remove all ethanol (use pipette).
- Wait for ethanol to evaporate (~1hr).
- Add 80 μl ddH2O to the DNA pellet and resuspend it.
- Use nano drop (inject 1 μL sample to machine) to test the concentration of the DNA.
Concentration
- [2]pET28a-pNorVb-EGFP 8.076 μg/μl (failed)
- [6]pET28a-pchA-PpchA-PLEE1-EGFP 21.14 μg/μl (successful)
- [7]pET28a-T7-HBD-CRT-TER 7.99 μg/μl (failed)
Record 07 Plasmid Transformation of [6] MaterialsMethod
Equipment
- [6]pET28a-pchA-PpchA-PLEE1-EGFP 21.14 μg/μl
- LB agar plate with Kanamycin
- Ice
- LB broth
- Competent cell (EcN)
Procedure
- Add 5 μL of plasmid to the cells. Pipette gently. DO NOT vortex.
- Place mixture on ice for 20 minutes.
- Heat shock the mixture at 42°C for 1 minute.
- Place the mixture on ice for 2 minutes.
- Add 900μL of LB broth to the mixture. Pipette gently to mix.
- Incubate the mixture at 37°C for 1 hour. Shake at 300 rpm.
- Centrifuge at 4°C 4.5rpm for 5min
- Remove supernatant
- Resuspend cell pellet
- Add 50μL of mixture to 1 plates (50μL each). Spread evenly.
- Collect the cells using centrifugation and remove 700μL of LB. Do not remove the cells.
- Pipette gently to mix. Add 100 μL of mixture to each plate (it is 4.5x concentration). Streak the plate.
- Incubate the plates overnight at 37°C. If it is not immediately used, store in 4°C refrigerator.
Record 08 Preparation of Medium and Kanamycin Plates MaterialsMethod
Equipment
- Plate with Kanamycin
- Kanamycin stock solution
- Alcohol lamp
- [2] glycerol stock
- LB broth powder
Procedure
Streaking [2] on an LB Agar gel plate procedure
- Sterilize the wire loop.
- Dip the sterile loop into BL21 stock to collect samples.
- Insert the loop in the plate and streak the plate with it.
- Put the plate upside down into a 37℃ incubator.
LB broth preparation
- Measure 450ml of Mili Q water, and 9g of LB broth powder
- Mix the powder with water
- Allocate 150ml of the solution into three flasks, incubate them at 37°C overnight
Record 09 Midi of [2]&[7] MaterialsMethod
Equipment
- NucleoBond® Xtra Midi Plus
- Isopropanol
- Ethanol
- Dd H2O
- [2]pET28a-pNorVb-EGFP plasmid-containing bacterial strain
- [7]pET28a-T7-HBD-CRT-TER plasmid-containing bacterial strain
Procedure
- Inoculate 5mL starter culture of LB medium with a single colony picked from a freshly streaked agar plate.
- Shake at 37C and 300 rpm for 8h.
- Inoculate an overnight culture by diluting the starter culture 1/1000 into the given volumes of LB medium also containing the appropriate selective antibiotic.
- Grow the culture overnight at 37 °C and - 300 rpm for 12-16 h.
- Pellet 150 ml bacterial culture by centrifugation for 15 mins at 4500 x g.
- Discard the supernatant, and resuspend the bacteria by adding 8mL buffer RES + RNase A. (2.67 ml to each 50 ml tube). Use a vortex to resuspend the pellet.
- Check Buffer LYS for white precipitate. If present, warm the buffer for several minutes at 30-40 °C until the precipitate is dissolved completely. Cool buffer down to room temperature.
- Add 8 mL Buffer LYS to the samples.
- Mix gently by inverting the tube 5 times. Do not vortex.
- Incubate the mixture at room temperature for 5 min.
- Apply 12 mL Buffer EQU onto the rim of the column filter to make sure the filter is completely wet.
- Allow column to empty by gravity flow using 15mL conical tube as support (column does not run dry)
- Add 8mL Buffer NEU to the samples.
- Immediately invert the tube gently until blue samples turn colourless completely. Do not vortex(off-white flocculate present is normal)
- Invert the tube 3 times directly before applying the lysate to the Column Filter
- The lysate is simultaneously cleared and loaded onto the column. Refill the filter if more lysate has to be loaded than the filter is able to hold. Allow the column to empty by gravity flow.
- Wash the Column Filter and Column by applying 5 mL Buffer EQU to the rim of the filter.
- Discard the WHITE filter and wash the TRANSPARENT column by adding an 8mL Buffer WASH.
- Elute the plasmid DNA with 5mL Buffer ELU. (Use a new tube. We need this fluid, do not discard the flow out)
- Add 2ml room-temperature isopropanol to precipitate the eluted plasmid DNA and vortex until solution is uniform.
- Centrifuge at 4,500 x g for 20 min at 4C. Carefully discard the supernatant.
- Add 2 ml 70% ethanol, centrifuge at 4500 x g for 5 min. Remove all ethanol (use pipette).
- Wait for ethanol to evaporate (~1hr).
- Add 80 μl ddH2O to the DNA pellet and resuspend it.
- Use nano drop (inject 1 μL sample to machine) to test the concentration of the DNA.
Concentration
- [2]pET28a-pNorVb-EGFP 3.341 μg/μl (failed)
- [7]pET28a-T7-HBD-CRT-TER 86.64 μg/μl (successful)
Record 10 Midi of [2] MaterialsMethod
Equipment
- Beyotime Plasmid Midiprep Kit for All Purpose
- Ethanol
- ddH2O
- [2]pET28a-pNorVb-EGFP
Procedure
- Inoculate 5mL starter culture of LB medium with a single colony picked from a freshly streaked agar plate.
- Shake at 37C and 300 rpm for 8h.
- Inoculate an overnight culture by diluting the starter culture 1/1000 into the given volumes of LB medium also containing the appropriate selective antibiotic.
- Grow the culture overnight at 37 °C and - 300 rpm for 12-16 h.
- Transfer overnight culture to three 1.5 mL microcentrifuge tubes. Centrifuge at 5,000 × g for 3 minutes to pellet the bacteria. Discard the supernatant. Repeat the collection step once more so that each tube receives a total of 3 mL of overnight culture.
- Add 250 μl Solution I to each tube and resuspend pellets completely by vortexing until no clumps remain
- Add 250 μl Solution II to each tube, gently invert 4–6 times until the solution becomes clear. (Do not vortex).
- Add 350 μl Solution III and immediately invert 4–6 times until white precipitate forms. (Do not vortex).
- Centrifuge at max speed (~13,000 rpm) for 10 min at room temperature.
- Transfer the supernatant into a purification column, centrifuge at max speed for 2 mins, and discard flow-through; repeat for all three tubes using the same column.
- Add 500 μl Solution PB, centrifuge at max speed for 120 s, and discard flow-through.
- Add 750 μl Solution IV, centrifuge at max speed for 120 s, and discard flow-through.
- Centrifuge the empty column at max speed for 1 min to remove residual ethanol.
- Place the column in a clean 1.5 ml tube, add 120 μl ddH2O to the center of the membrane, and let sit for 1 min.
- Centrifuge at max speed for 1 min to collect the purified plasmid DNA.
Concentration
- [2]pET28a-pNorVb-EGFP 149.1μg/μl (successful)
Record 11 Plasmid Transformation of [2]&[7] MaterialsMethod
Equipment
- [2]pET28a-pNorVb-EGFP 149.1μg/μl
- [7]pET28a-T7-HBD-CRT-TER 86.64 μg/μl
- LB agar plate with Kanamycin
- Ice
- LB broth
- Competent cell (EcN)
Procedure
- Add 1 μL of [2] plasmid to the cells and 2μL of [7] plasmid to the cells. Pipette gently. DO NOT vortex.
- Place mixture on ice for 20 minutes.
- Heat shock the mixture at 42°C for 1 minute.
- Place the mixture on ice for 2 minutes.
- Add 900μL of LB broth to the mixture. Pipette gently to mix.
- Incubate the mixture at 37°C for 1 hour. Shake at 300 rpm.
- Centrifuge at 25°C 5rpm for 3min
- Remove supernatant
- Resuspend cell pellet
- Add 50μL of mixture to 1 plate (50μL each). Spread evenly.
- Incubate the plates overnight at 37°C. If it is not immediately used, store in a 4°C refrigerator.
Record 12 PCR + Gel Electrophoresis of [2][3][6][7] MaterialsMethod
Equipment
- [2]pET28a-pNorVb-EGFP Plasmid DNA
- [3]pET-T7-PTB-BUK Plasmid DNA
- [6]pET28a-pchA-PpchA-PLEE1-EGFP Plasmid DNA
- [7]pET28a-T7-HBD-CRT-TER Plasmid DNA
- Ice
- Loading buffer
- primer
- DNA ladder marker (100 - 600 bp)
Procedure
- Dilute DNA by 100x (1 DNA: 99 ddH2O).
- Dilute primer by 10x (10 DNA: 90 ddH2O).
- Add ddH2O 9μL, DNA 1μL , primer fwd 1.25μL, primer rev 1.25μL.
- Add Master Mix 12.5μL last , total volume 25μL.
- Mix by pipetting.
- Transfer PCR tubes to a PCR machine.
- Start with an initial denaturation at 98°C for 30 seconds.
- Run 35 cycles of denaturation at 98°C for 5–10 seconds.
- Annealing at 50–72°C for 10–30 seconds, and extension at 72°C for 20–30 seconds per kilobase of target.
- Finish with a final extension at 72°C for 2 minutes and hold at 4–10°C.
- Move tray and gel to the kit. Add TAE buffer until it covers up the gel.
- Transfer 10 μL DNA to a new PCR tube.
- Add loading dye. 6x loading dye, so 2μL dye + 10 μL DNA = 12μL.
- Add 12μL ladder into the first well.
- Add the rest of the samples carefully into the wells. Better leave one blank well between loaded wells. (e.g. [marker][ ][sample 1][ ][sample 2])
- Place the cover and plug in positive and negative wires.
- Start the voltage provider.
- Run the gel at 100 V until the dye line is approximately 75-80% of the way down the gel. A typical run time is about 1 hours, depending on the gel concentration and voltage.
- Visualize your DNA fragments with UV light.
02 Month group
June 2026
- Records
- 26
- Tables
- 2
- Figures
- 1
Record 01 PCR + Gel Electrophoresis of [2][3][6] MaterialsMethod
Equipment
- [2]pET28a-pNorVb-EGFP
- [3]pET-T7-PTB-BUK
- [6]pET28a-pchA-PpchA-PLEE1-EGFP
- Ice
- dye
- primer
- DNA ladder
Procedure
- Dilute DNA by 100x (1 DNA: 99 ddH2O).
- Dilute primer by 10x (10 DNA: 90 ddH2O).
- Add ddH2O 9μL, DNA 1μL , primer fwd 1.25μL, primer rev 1.25μL.
- Add Master Mix 12.5μL last , total volume 25μL.
- Mix by pipetting.
- Transfer PCR tubes to a PCR machine.
- Start with an initial denaturation at 98°C for 30 seconds.
- Run 35 cycles of denaturation at 98°C for 5–10 seconds.
- Annealing at 50–72°C for 10–30 seconds, and extension at 72°C for 20–30 seconds per kilobase of target.
- Finish with a final extension at 72°C for 2 minutes and hold at 4–10°C.
- Move the tray and gel to the kit. Add TAE buffer until it covers up the gel.
- Transfer 10 μL DNA to a new PCR tube.
- Add loading dye. 6x loading dye, so 2μL dye + 10 μL DNA = 12μL.
- Add 12μL ladder into the first well.
- Add the rest of the samples carefully into the wells. Better leave one blank well between loaded wells. (e.g. [marker][ ][sample 1][ ][sample 2])
- Place the cover and plug in positive and negative wires.
- Start the voltage provider.
- Run the gel at 100 V until the dye line is approximately 75-80% of the way down the gel. A typical run time is about 1 hour, depending on the gel concentration and voltage.
- Visualize your DNA fragments with UV light.
Record 02 IPTG induction of [7] MaterialsMethod
Equipment
- [7]
- IPTG 0.1M Stock Solution
- Incubator
- Monochromator
- Cuvette
- LB Broth
Procedure
- Add start culture to 20 mL LB with 20 μL Kan, shake at 250 rpm 37°C for 2.5 hours (until OD600=0.6-0.8 [0.7])
- Pipette 0.1M IPTG to induce (1/1000, v/v) bacterial culture for 16-20 hours
Record 03 Protein extraction + BCA MaterialsMethodResult1 figure
Equipment
- [7] culture
- IPTG Stock Solution
- PBS
Procedure
- Take 20 mL culture as bacterial culture for test, pour the rest into a falcon centrifuging tube and balance their weight.
- Centrifuge at 4600 g for 15 minutes.
- Discard supernatant, wash cell pellets with a total of 1mL PBS thoroughly.
- Centrifuge at 22k rpm for 5 minutes.
- Discard supernatant, wash cell pellets with a total of 1mL PBS thoroughly.
- Sonify the cell mixture at 40%, 5 sec on 25 sec off, 1 minute/ run and rest for 1 minute after each round. Repeat for 6 times.
- Store the sonified solution in 1 mL tube in the 4°C fridge. The crude enzyme extraction can be used in the following
a. Put the cup in ice (must cover the surrounding of the cup to absorb heat).
b. Clean the tip with ethanol and distilled water every time.
c. Submerge the tip in the liquid and place it just a bit up on the bottom of the cup (do not touch the bottom and do not place it just around the surface of the liquid).
Result
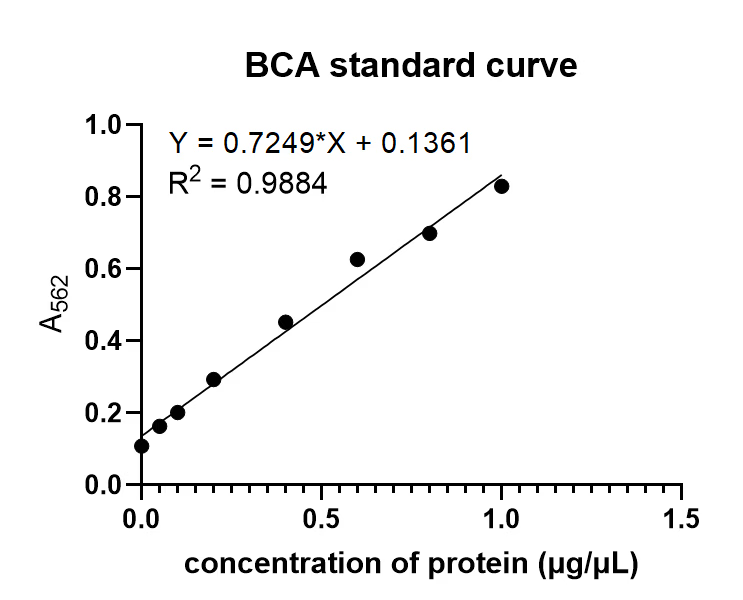
A562 of [7] = 0.320
Protein concentration of [7] = 0.254 μg/μL
Record 04 Midi of [1][4][5] MaterialsMethod
Equipment
- Beyotime Plasmid Midiprep Kit for All Purpose
- Ethanol
- Dd H2O
- [1]pET28a-Ptac-EGFP plasmid-containing bacterial strain
- [4]pET28a-Lacl-Ppcha-Ptac-EGFP plasmid-containing bacterial strain
- [5]pET28a-Lacl-Ppcha<..->PtaC-TER-CRT-HBD plasmid-containing bacterial strain
Procedure
- Inoculate 5mL starter culture of LB medium with a single colony picked from a freshly streaked agar plate.
- Shake at 37C and 300 rpm for 8h.
- Inoculate an overnight culture by diluting the starter culture 1/1000 into the given volumes of LB medium also containing the appropriate selective antibiotic.
- Grow the culture overnight at 37 °C and - 300 rpm for 12-16 h.
- Transfer overnight culture to three 1.5 mL microcentrifuge tubes. Centrifuge at 5,000 × g for 3 minutes to pellet the bacteria. Discard the supernatant. Repeat the collection step once more so that each tube receives a total of 3 mL of overnight culture.
- Add 250 μl Solution I to each tube and resuspend pellets completely by vortexing until no clumps remain
- Add 250 μl Solution II to each tube, gently invert 4–6 times until the solution becomes clear. (Do not vortex).
- Add 350 μl Solution III and immediately invert 4–6 times until white precipitate forms. (Do not vortex).
- Centrifuge at max speed (~13,000 rpm) for 10 min at room temperature.
- Transfer the supernatant into a purification column, centrifuge at max speed for 2 mins, and discard flow-through; repeat for all three tubes using the same column.
- Add 500 μl Solution PB, centrifuge at max speed for 1 min, and discard flow-through.
- Add 750 μl Solution IV, centrifuge at max speed for 1 min, and discard flow-through.
- Centrifuge the empty column at max speed for 3 min to remove residual ethanol.
- Place the column in a clean 1.5 ml tube, add 120 μl ddH2O to the center of the membrane, and let sit for 1 min.
- Centrifuge at max speed for 1 min to collect the purified plasmid DNA.
Concentration
- [1]pET28a-Ptac-EGFP 276.4 ng/ul (successful)
- [4]pET28a-Lacl-Ppcha-Ptac-EGFP 270.7 ng/ul (successful)
- [5]pET28a-Lacl-Ppcha<..->PtaC-TER-CRT-HBD 386 ng/ul (successful)
Record 05 Plasmid Transformation MaterialsMethod
Equipment
- [1]pET28a-Ptac-EGFP Plasmid DNA 276.4 ng/ul
- [4]pET28a-Lacl-Ppcha-Ptac-EGFP 270.7 ng/ul
- [5]pET28a-Lacl-Ppcha<..->PtaC-TER-CRT-HBD 386 ng/ul
- LB agar plate with Kanamycin
- Ice
- LB broth
- Competent cell (EcN)
Procedure
- Add 1 μL of [1][4][5] plasmid to the cells and to the cells. Pipette gently. DO NOT vortex.
- Place mixture on ice for 20 minutes.
- Heat shock the mixture at 42°C for 1 minute.
- Place the mixture on ice for 2 minutes.
- Add 900μL of LB broth to the mixture. Pipette gently to mix.
- Incubate the mixture at 37°C for 1 hour. Shake at 300 rpm.
- Centrifuge at 25°C 5,000 rpm for 3min
- Remove supernatant
- Resuspend cell pellet
- Add 50μL of mixture to 1 plates (50μL each). Spread evenly.
- Incubate the plates overnight at 37°C. If it is not immediately used, store in 4°C refrigerator.
Record 06 Plasmid Transformation MaterialsMethod
Equipment
- [1]pET28a-Ptac-EGFP
- [4]pET28a-Lacl-Ppcha-Ptac-EGFP
- [5]pET28a-Lacl-Ppcha<..->PtaC-TER-CRT-HBD
- LB agar plate with Kanamycin
- Ice
- LB broth
- Competent cell (EcN)
Procedure
- Add 1 μL of [1][4][5] plasmid to the cells and to the cells. Pipette gently. DO NOT vortex.
- Place mixture on ice for 20 minutes.
- Heat shock the mixture at 42°C for 1 minute.
- Place the mixture on ice for 2 minutes.
- Add 900μL of LB broth to the mixture. Pipette gently to mix.
- Incubate the mixture at 37°C for 1 hour. Shake at 300 rpm.
- Centrifuge at 25°C 5,000 rpm for 3min
- Remove supernatant
- Resuspend cell pellet
- Add 50μL of mixture to 1 plates (50μL each). Spread evenly.
- Incubate the plates overnight at 37°C. If it is not immediately used, store in 4°C refrigerator.
Record 07 RNA Extraction + Agarose Gel Electrophoresis for RNA + Reverse Transcription of [3] MaterialsMethod
Equipment
- [3]pET-T7-PTB-BUK
- pET11a(control)
- LB broth
- Ampicillin
- Polystyrene Round-Bottom Tube
- Incubator (shaking, 220 rpm, 37°C)
- IPTG
- 1.5 mL microtube
- Centrifuge
- TRizol reagent
- Chloroform
- Fume hood
- 100% isopropanol
- 75% ethanol
- 80% ethanol
- RNase-free water
- cDNA synthetic master mix (5x)
- PCR tube
- PCR machine (thermal cycler)
- Agar Gel
- 1x TAE
- Loading buffer
- DNA Ladder Marker
Procedure
- Remove medium
- Add 1ml TRizol per well and pipet/wash the well for several times
- Transfer the mixture into a new 1.5ml or 2ml microtube
- RT, 5min incubation
- Add 0.2ml chloroform at fume hood and invert by hand for 10s (or vortex to mix)
- RT, 3min incubation
- Cfg. (12000xg, 15min, 4°C)
- Transfer the aqueous layer to a new 1.5ml microtube
- Add 0.5ml 100% isopropanol to the aqueous layer
- RT, 10 min incubation
- Cfg. (12000xg, 10 min, 4°C)
- Remove the supernatant and wash the RNA pellet with 1ml 75% ethanol.
- Invert the sample
- Cfg. (14000rpm, 5min, 4°C), remove the supernatant
- Remove the supernatant and wash the RNA pellet with 1ml 80% ethanol.
- Invert the sample
- Repeat step 14~16 for once
- Quick Cfg. (14000rpm, 5min, 4°C), remove the supernatant
- Dry the pellet for 10~20min, RT
- Resuspend the RNA pellet with 30~60ul RNase-free water
- Incubate, 55°C, 10min (store at -80°C)
- Add 8ul cDNA synthetic master mix (5x), 29.8ul RNase-free water, 2.2ul RNA(control) into a PCR tube. Adjust total volume to 40ul.
- Add 8ul cDNA synthetic master mix (5x), 20ul RNase-free water, 12ul RNA[3] into a PCR tube. Adjust total volume to 40ul.
- Mix by pipetting.
- Preheat the PCR machine to 42°C.
- Transfer the PCR tubes to a PCR machine.
- Incubate, 42°C, 10 minutes for reverse transcription.
- Incubate, 80°C, 10 minutes to inactivate the reverse transcriptase and terminate the reaction.
Record 08 Preparation of Sodium Butyrate Stock Solution MaterialsMethod
Equipment
- Sodium butyrate powder
- ddH2O
Procedure
- Measure 0.5505g of sodium butyrate.
- Mix and resuspend with 5ml of ddH2O.
- Pipette the solution to 5 labelled 1mL tubes with 1mL of 1M sodium butyrate solution each.
- Place 1 tube in -20C fridge(throw away IN 1 MONTH)
- Place the other 4 tubes in -80C fridge(throw away IN 6 MONTHS, move one to -20C if the one in step 4 is used up)
Record 09 RNA Extraction + Reverse Transcription of [1][4][5][6][7] MaterialsMethod
Equipment
- [1]pET28a-Ptac-EGFP EcN Culture
- [4]pET28a-Lacl-Ppcha-Ptac-EGFP EcN Culture
- [5]pET28a-Lacl-Ppcha-PtaC-HBD-CRT-TER EcN Culture
- [6]pET28a-pchA-PpchA-PLEE1-EGFP EcN Culture
- [7]pET28a-T7-HBD-CRT-TER EcN Culture
- pET11a(control)
- LB broth
- Ampicillin
- Polystyrene Round-Bottom Tube
- Incubator (shaking, 220 rpm, 37°C)
- IPTG
- 1.5 mL microtube
- Centrifuge
- TRizol reagent
- Chloroform
- Fume hood
- 100% isopropanol
- 75% ethanol
- 80% ethanol
- RNase-free water
- cDNA synthetic master mix (5x)
- PCR tube
- PCR machine (thermal cycler)
Procedure
- Measure 30mL LB broth, pipette 5mL of LB broth and 5 uL of Kanamycin into [1],[4],[5],[6],[7] Polystyrene and 5ul of Ampicillin Polystyrene Round-Bottom Tube, total 6.
- Place 50uL [1],[4],[5],[6],[7],pET11a(control into each tube.
- Place onto the incubator (at 220 rpm and 37C) wait od 600 until 0.5-0.6.
- add iptg 5ul into [1],[4],[5],[6],[7] tube wait 2.5-4 hour
- add 1ml [1],[4],[5],[6],[7],pET11a into a new 1.5mL microtube
- Cfg. (5000rpm, 3min, 4°C)
- Remove medium
- Add 1ml TRizol per well and pipet/wash the well for several times
- Transfer the mixture into a new 1.5ml or 2ml microtube
- RT, 5min incubation
- Add 0.2ml chloroform at fume hood and invert by hand for 10s (or vortex to mix)
- RT, 3min incubation
- Cfg. (12000xg, 15min, 4°C)
- Transfer the aqueous layer to a new 1.5ml microtube
- Add 0.5ml 100% isopropanol to the aqueous layer
- RT, 10 min incubation
- Cfg. (12000xg, 10 min, 4°C)
- Remove the supernatant and wash the RNA pellet with 1ml 75% ethanol.
- Invert the sample
- Cfg. (14000rpm, 5min, 4°C), remove the supernatant
- Remove the supernatant and wash the RNA pellet with 1ml 80% ethanol.
- Invert the sample
- Repeat step 14~16 for once
- Quick Cfg. (14000rpm, 5min, 4°C), remove the supernatant
- Dry the pellet for 10~20min, RT
- Resuspend the RNA pellet with 30~60ul RNase-free water
- Incubate, 55°C, 10min (store at -80°C)
Record 10 Agarose gel electrophoresis for RNA of [1][4][5][6][7] MaterialsMethod
Equipment
- Agar Gel
- 1x TAE
- Loading buffer
- DNA Ladder Marker
Procedure
- Prepare 1% agarose gel (2g agarose + 20 ml 1xTAE)
- Use microwave to dissolve the agarose
- When it cools down to touchable temperature, add 2ul SYBR safe dye to the flask (10000x SYBR, 1ul for 10 mL 1xTAE)
- Pour the solution into wide teeth(4mm wide, 1 mm thick teeth) and cool it down
- Run gel (Well: 20ul max.)
- Move the tray and gel to the kit. Add TAE buffer until it covers up the gel.
- Transfer 15 ul RNA to a new PCR tube.
- Add loading dye. 0.5 ul dye + 2.5 ul RNA.
- Add the rest of the samples carefully into the wells.
- Place the cover and plug in positive and negative wires.
- Start the voltage provider.
- Run the gel at 150 V until the dye line is approximately 75-80% of the way down the gel. A typical run time is about 1-1.5 hours, depending on the gel concentration and voltage.
- Visualize your DNA fragments with UV light.
- Bands of [1]pET28a-Ptac-EGFP, [4]pET28a-Lacl-Ppcha-Ptac-EGFP, [5]pET28a-Lacl-Ppcha-PtaC-HBD-CRT-TER are vague and light, the test needs to be carried out again.
- Bands of pET11a, [6]pET28a-pchA-PpchA-PLEE1-EGFP, [7]pET28a-T7-HBD-CRT-TER are clear and bright, indicating successful results.
Record 11 Streaking cells on plate [1][2][3][4][5] MaterialsMethod
Equipment
- Plate
- Alcohol lamp
- [1]pET28a-Ptac-EGFP EcN glycerol stock
- [2]pET28a-pNorVb-EGFP EcN glycerol stock
- [3]pET-T7-PTB-BUK EcN glycerol stock
- [4]pET28a-Lacl-Ppcha-Ptac-EGFP EcN glycerol stock
- [5]pET28a-Lacl-Ppcha-PtaC-HBD-CRT-TER EcN glycerol stock
Procedure
Streaking [1][4][5] on an LB Agar gel plate procedure
- Sterilize the wire loop.
- Dip the sterile loop into [1]pET28a-Ptac-EGFP, [4]pET28a-Lacl-Ppcha-Ptac-EGFP, [5]pET28a-Lacl-Ppcha-PtaC-HBD-CRT-TER stock to collect samples.
- Insert the loop in the plate with ampicillin and streak the plate with it.
- Put the plate upside down into a 37℃ incubator.
Streaking [2] and pET11a on an LB Agar gel plate procedure
- Sterilize the wire loop.
- Dip the sterile loop into [2]pET28a-pNorVb-EGFP and pET11a stock to collect samples.
- Insert the loop in the plate with kanamycin and streak the plate with it.
- Put the plate upside down into a 37℃ incubator.
Record 12 Protein extraction of [2] by Sonification MaterialsMethod
Equipment
- [2]pET28a-pNorVb-EGFP overnight culture
- IPTG Stock Solution
- PBS
Procedure
- Take 20 mL culture as bacterial culture for test, pour the rest into a falcon centrifuging tube and balance their weight.
- Centrifuge at 4600 g for 15 minutes.
- Discard supernatant, wash cell pellet with a total of 1mL PBS thoroughly.
- Centrifuge at 22k rpm for 5 minutes.
- Discard supernatant, wash cell pellet with a total of 1mL PBS thoroughly.
- Sonify the cell mixture at 40%, 5 sec on 25 sec off, 1 minute/ run and rest for 1 minute after each round. Repeat for 6 times.
Record 13 BCA of [2] Protein MaterialsMethod1 table
Equipment
- BCA kit
- 96-well microplate
- [2] pNorVb-EGFP protein
Procedure
- Prepare the BCA working reagent by mixing 2000µL BCA reagent A and 40µL BCA reagent B (50:1) thoroughly.
- Add BSA standard solutions according to the table below:
| well num | 0 | 1 | 2 | 3 | 4 | 5 | 6 | 7 |
|---|---|---|---|---|---|---|---|---|
| BSA standard(µL) | 0 | 1 | 2 | 4 | 8 | 12 | 16 | 20 |
| distilled water (µL) | 20 | 19 | 18 | 16 | 12 | 8 | 4 | 0 |
| BCA working reagent (µL) | 200 | 200 | 200 | 200 | 200 | 200 | 200 | 200 |
- Mix well by pipetting.
- Add 20 µL of the supernatant from [2] protein to a well, pipet thoroughly.
- Incubate the plate at 37°C for 20 minutes.
- Measure the absorbance at 562 nm using a microplate reader.
Record 14 RT-PCR of [3][4][7] MaterialsMethod
Equipment
- [3]pET-T7-PTB-BUK cDNA
- [4]pET28a-Lacl-Ppcha-Ptac-EGFP cDNA
- [7]pET28a-T7-HBD-CRT-TER cDNA
- Master Mix
- Loading buffer
- DNA Marker (100 - 600bp)
Procedure
- Calculate the volume of cDNA needed to add. Total cDNA added should be 1ug
- In this test, we use 1 ul of cNDA (contain 1ug of cDNA)
- The total sample volume should add up to 25 ul.
- Dilute the primer to 10 uM. Originally it’s 100 uM, so 1 ul primer : 9 ul H2O. If the primer is already 10 uM, skip this step.
- Add Master Mix (12.5ul), ddH2O (9 ul), DNA (1ul), primer (forward and reverse, in total 2.5 ul) in order.
- Use the PCR machine at 3F.
- The PCR takes ~2 hours. In the meantime, prepare agarose gel, 1xTAE buffer (~500 ml); find 10000x SYBR safe, loading dye and 1kb ladder (marker).
Record 15 Agarose gel electrophoresis for cDNA of [3][4][7] MaterialsMethod
Equipment
- Agar gel powder
- 1x TAE
- SYBR safe dye
- DNA Marker (100 - 600 bp)
Procedure
- Prepare 1% agarose gel (2g agarose + 20 ml 1xTAE)
- Use microwave to dissolve the agarose
- When it cools down to touchable temperature, add 2ul SYBR safe dye to the flask (10000x SYBR, 1ul for 10 mL 1xTAE)
- Pour the solution into wide teeth(4mm wide, 1 mm thick teeth) and cool it down
- Run gel (Well: 20ul max.)
- Move the tray and gel to the kit. Add TAE buffer until it covers up the gel.
- Transfer 15 ul RNA to a new PCR tube.
- Add loading dye. 0.5 ul dye + 2.5 ul cDNA.
- Add the rest of the samples carefully into the wells.
- Place the cover and plug in positive and negative wires.
- Start the voltage provider.
- Run the gel at 150 V until the dye line is approximately 75-80% of the way down the gel. A typical run time is about 1-1.5 hours, depending on the gel concentration and voltage.
- Visualize your DNA fragments with UV light.
- Bands of [3]-PTB, [3]-BUK, [4]-Ptac-EGFP,[7]-TER, [7]-CRT and [7]-HBDare vague and light, the test needs to be carried out again.
- The band of [4]-Lacl is clear and bright, indicating successful results.
Record 16 Plasmid Transformation of [1] MaterialsMethod
Equipment
- [1]pET28a-Ptac-EGFP
- pET11a
- pET-EGFP
- LB agar plate with Kanamycin
- LB agar plate with Ampicilin
- Ice
- LB broth
- Competent cell (EcN)
Procedure
- Add 100 μg of plasmid to the cells. Pipette gently. DO NOT vortex.
- Place mixture on ice for 20 minutes.
- Heat shock the mixture at 42°C for 1 minute.
- Place the mixture on ice for 2 minutes.
- Add 900μL of LB broth to the mixture. Pipette gently to mix.
- Incubate the mixture at 37°C for 1 hour. Shake at 300 rpm.
- Centrifuge at 4°C 4.5rpm for 5min
- Remove supernatant
- Resuspend cell pellet
- Add 50μL of mixture to 1 plates (50μL each). Spread evenly.
- Collect the cells using centrifugation and remove 700μL of LB. Do not remove the cells.
- Pipette gently to mix. Add 100 μL of mixture to each plate (it is 4.5x concentration). Streak the plate.
- Incubate the plates overnight at 37°C. If it is not immediately used, store in 4°C refrigerator.
Record 17 Plasmid Transformation of [1][3][7] MaterialsMethod
Equipment
- [1]pET28a-Ptac-EGFP
- [3]pET-T7-PTB-BUK
- [7]pET28a-T7-HBD-CRT-TER
- LB agar plate with Kanamycin
- LB agar plate with Ampicilin and Kanamycin
- Ice
- LB broth
- Competent cell (EcN)
Procedure
- Add 100 μg of plasmid to the cells. Pipette gently. DO NOT vortex.
- Place mixture on ice for 20 minutes.
- Heat shock the mixture at 42°C for 1 minute.
- Place the mixture on ice for 2 minutes.
- Add 900μL of LB broth to the mixture. Pipette gently to mix.
- Incubate the mixture at 37°C for 1 hour. Shake at 300 rpm.
- Centrifuge at 4°C 4.5rpm for 5min
- Remove supernatant
- Resuspend cell pellet
- Add 50μL of mixture to 1 plates (50μL each). Spread evenly.
- Collect the cells using centrifugation and remove 700μL of LB. Do not remove the cells.
- Pipette gently to mix. Add 100 μL of mixture to each plate (it is 4.5x concentration). Streak the plate.
- Incubate the plates overnight at 37°C. If it is not immediately used, store in 4°C refrigerator.
Record 18 Protein extraction of [2][3][4][5][6] Materials
Equipment
- [2][3][4][5][6] EcN
- pET11a EcN
- pET-EGFP EcN
- PBS
- RIPA buffer + protease inhibitor
Procedure
- Take 5 mL culture as bacterial culture for test, pour the rest into a falcon centrifuging tube and balance their weight.
- Place the cell culture dish in ice and wash the cells with ice-cold PBS.
- Discard Supernatant by centrifugation, then add ice-cold RIPA buffer+protease inhibitor (1 ml per culture).
- gently transfer the cell suspension into a precooled microcentrifuge tube.
- Maintain constant agitation for 30 min at 4°C.
- Spin at 16,000 x g for 20 min in a 4°C precooled centrifuge.
- Gently remove the centrifuge tube and place it on ice.
- Transfer the supernatant to a fresh tube, also kept on ice, and discard the pellet.
- Remove a small volume (10-20 ul) of lysate to perform a BCA assay. Determine the protein concentration foreach cell lysate.
- Repeated freeze and thaw cycles cause protein degradation and should be avoided.
- Boil each cell lysate in sample buffer at 95°C for 5 min.
Record 19 Western Blot of [2][3][4][5][6] (Day 1) MaterialsMethod
Equipment
- [2][3][4][5][6] protein
- pET11a protein
- pET-EGFP protein
- TBS
- Marker
- Loading buffer
- SDS-PAGE buffer
- PVDF membrane
- Transfer sandwich
- Transfer buffer
- Blocking buffer
- Primary antibody solution:
- GFP RABBIT: 1, 2, 4, 6
- HA RABBIT: 3, 5, 7
- C-MYC RABBIT: 5, 7
- FLAG MOUSE: 3, 5, 7
Procedure
Protein separation by gel electrophoresis
- Load 20uL of protein into the wells format SDS-PAGE gel, along with molecular weight markers.
- Run the gel for 120 min at 120 V.
Transferring the protein from the gel to the membrane
- Place the gel in 1x transfer buffer for 10-15 min.
- Assemble the transfer sandwich and make sure no air bubbles are trapped in the sandwich. The blot should be on the cathode and the gel on the anode.
- Place the cassette in the transfer tank and place an ice block in the tank.
- Transfer 1 hr in a coldroom at a constant current of 200 mA.
- Note: Transfer can also be done at 100 V for 30 min-2 hr, but the method needs to be optimized for proteins of different sizes.
Primary Antibody incubation
- Rinse the membrane with three washes with TBST.
- Block in 2.5% (w/v) non fat milk in TBST at room temperature for 1 hr.
- Incubate overnight in the primary antibody solution against the target protein at 4°C.
Record 20 Western Blot (Day 2) MaterialsMethod
Equipment
- TBST
- Secondary antibody
- ECL chemiluminescence
- Imager
Procedure
Secondary Antibody incubation
- Rinse the blot 3-5 times for 5 min with TBST.
- Incubate in the HRP-conjugated secondary antibody solution for 1 hr at room temperature.
- Note: The antibody can be diluted using 5% skim milk in TBST.
- Rinse the blot 3-5 times for 5 min with TBST.
Imaging
- Apply the chemiluminescent substrate to the blot according to the manufacturer's recommendation.
- Capture the chemiluminescent signals using a CCD camera-based imager.
- Use image analysis software to read the band intensity of the target proteins.
Record 21 RNA Extraction of [1][5] MaterialsMethod
Equipment
- [1]pET28a-Ptac-EGFP EcN
- [5]pET28a-Lacl-Ppcha-PtaC-HBD-CRT-TER EcN
- LB broth
- Ampicillin
- Polystyrene Round-Bottom Tube
- Incubator (shaking, 220 rpm, 37°C)
- IPTG
- 1.5 mL microtube
- Centrifuge
- TRizol reagent
- Chloroform
- Fume hood
- 100% isopropanol
- 75% ethanol
- 80% ethanol
- RNase-free water
- cDNA synthetic master mix (5x)
- PCR tube
- PCR machine (thermal cycler)
Procedure
- Measure 10mL LB broth, pipette 5mL of LB broth and 5 uL of Kanamycin into each Polystyrene Round-Bottom Tube, total 2.
- Place 50uL [1], [5] into each tube.
- Place onto the incubator (at 220 rpm and 37C) wait OD600 until 0.5-0.6.
- add iptg 5ul into each tube wait 2.5-4 hour
- add 1ml [1] ,[5] into a new 1.5mL microtube
- Cfg. (5000rpm, 3min, 4°C)
- Remove medium
- Add 1ml TRizol per well and pipet/wash the well for several times
- Transfer the mixture into a new 1.5ml or 2ml microtube
- RT, 5min incubation
- Add 0.2ml chloroform at fume hood and invert by hand for 10s (or vortex to mix)
- RT, 3min incubation
- Cfg. (12000xg, 15min, 4°C)
- Transfer the aqueous layer to a new 1.5ml microtube
- Add 0.5ml 100% isopropanol to the aqueous layer
- RT, 10 min incubation
- Cfg. (12000xg, 10 min, 4°C)
- Remove the supernatant and wash the RNA pellet with 1ml 75% ethanol.
- Invert the sample
- Cfg. (14000rpm, 5min, 4°C), remove the supernatant
- Remove the supernatant and wash the RNA pellet with 1ml 80% ethanol.
- Invert the sample
- Repeat step 14~16 for once
- Quick Cfg. (14000rpm, 5min, 4°C), remove the supernatant
- Dry the pellet for 10~20min, RT
- Resuspend the RNA pellet with 30~60ul RNase-free water
Record 22 RNA Extraction+Agarose gel electrophoresis for RNA+ Reverse Transcription of [1][5][6] Recorded notes
- [1]pET28a-Ptac-EGFP EcN
- [5]pET28a-Lacl-Ppcha-PtaC-HBD-CRT-TER EcN
- [6]pET28a-pchA-PpchA-PLEE1-EGFP EcN
- LB broth
- Ampicillin
- Polystyrene Round-Bottom Tube
- Incubator (shaking, 220 rpm, 37°C)
- IPTG
- 1.5 mL microtube
- Centrifuge
- TRizol reagent
- Chloroform
- Fume hood
- 100% isopropanol
- 75% ethanol
- 80% ethanol
- RNase-free water
- cDNA synthetic master mix (5x)
- PCR tube
- PCR machine (thermal cycler)
Procedure
- Measure 15mL LB broth, pipette 5mL of LB broth and 5 uL of Kanamycin into each Polystyrene Round-Bottom Tube, total 3.
- Place 50uL [1], [5],[6] into each tube.
- Place onto the incubator (at 220 rpm and 37C) wait OD600 until 0.5-0.6.
- add iptg 5ul into each tube wait 2.5-4 hour
- add 1ml [1] ,[5],[6] into a new 1.5mL microtube
- Cfg. (5000rpm, 3min, 4°C)
- Remove medium
- Add 1ml TRizol per well and pipet/wash the well for several times
- Transfer the mixture into a new 1.5ml or 2ml microtube
- RT, 5min incubation
- Add 0.2ml chloroform at fume hood and invert by hand for 10s (or vortex to mix)
- RT, 3min incubation
- Cfg. (12000xg, 15min, 4°C)
- Transfer the aqueous layer to a new 1.5ml microtube
- Add 0.5ml 100% isopropanol to the aqueous layer
- RT, 10 min incubation
- Cfg. (12000xg, 10 min, 4°C)
- Remove the supernatant and wash the RNA pellet with 1ml 75% ethanol.
- Invert the sample
- Cfg. (14000rpm, 5min, 4°C), remove the supernatant
- Remove the supernatant and wash the RNA pellet with 1ml 80% ethanol.
- Invert the sample
- Repeat step 14~16 for once
- Quick Cfg. (14000rpm, 5min, 4°C), remove the supernatant
- Dry the pellet for 10~20min, RT
- Resuspend the RNA pellet with 30~60ul RNase-free water
- Incubate, 55°C, 10min (store at -80°C)
- Prepare 1% agarose gel (2g agarose + 20 ml 1xTAE)
- Use microwave to dissolve the agarose
- When it cools down to touchable temperature, add 2ul SYBR safe dye to the flask (10000x SYBR, 1ul for 10 mL 1xTAE)
- Pour the solution into wide teeth(4mm wide, 1 mm thick teeth) and cool it down
- Run gel (Well: 20ul max.)
- Move tray and gel to the kit. Add TAE buffer until it covers up the gel.
- Transfer 15 ul RNA to a new PCR tube.
- Add loading dye. 0.5 ul dye + 2.5 ul RNA.
- Add the rest of the samples carefully into the wells.
- Place the cover and plug in positive and negative wires.
- Start the voltage provider.
- Run the gel at 150 V until the dye line is approximately 75-80% of the way down the gel. A typical run time is about 1-1.5 hours, depending on the gel concentration and voltage.
- Visualize your DNA fragments with UV light.
- Bands of [1]pET28a-Ptac-EGFP, [5]pET28a-Lacl-Ppcha-PtaC-HBD-CRT-TER, [6]pET28a-pchA-PpchA-PLEE1-EGFP are clear and bright, indicating successful results.
- Add 8ul cDNA synthetic master mix (5x), 29.84ul RNase-free water, 2.16ul RNA[1] into a PCR tube. Adjust total volume to 40ul.
- Add 8ul cDNA synthetic master mix (5x), 19.41ul RNase-free water, 12.59ul RNA[5] into a PCR tube. Adjust total volume to 40ul.
- Add 8ul cDNA synthetic master mix (5x), 8.22ul RNase-free water, 23.78ul RNA[6] into a PCR tube. Adjust total volume to 40ul.
- Mix by pipetting.
- Preheat the PCR machine to 42°C.
- Transfer the PCR tubes to a PCR machine.
- Incubate, 42°C, 10 minutes for reverse transcription.
- Incubate, 80°C, 10 minutes to inactivate the reverse transcriptase and terminate the reaction.
Record 23 cDNA PCR MaterialsMethod
Equipment
- [1]pET28a-Ptac-EGFP cDNA
- [5]pET28a-Lacl-Ppcha-PtaC-HBD-CRT-TER cDNA
- [6]pET28a-pchA-PpchA-PLEE1-EGFP cDNA
- Master Mix
Procedure
- Calculate the volume of cDNA needed to add. Total cDNA added should be 1ug
- In this test, we use 1 ul of cNDA (contain 1ug of cDNA)
- The total sample volume should add up to 25 ul.
- Dilute the primer to 10 uM. Originally it’s 100 uM, so 1 ul primer : 9 ul H2O. If the primer is already 10 uM, skip this step.
- Add Master Mix (12.5ul), ddH2O (9 ul), DNA (1ul), primer (forward and reverse, in total 2.5 ul) in order.
- Use the PCR machine at 3F.
- The PCR takes ~2 hours. In the meantime, prepare agarose gel, 1xTAE buffer (~500 ml); find 10000x SYBR safe, loading dye and 1kb ladder (marker).
Record 24 Agarose gel electrophoresis for cDNA MaterialsMethod
Equipment
- [1]pET28a-Ptac-EGFP cDNA
- [5]pET28a-Lacl-Ppcha-PtaC-HBD-CRT-TER cDNA
- [6]pET28a-pchA-PpchA-PLEE1-EGFP cDNA
- Loading Buffer
- Marker
- 1x TAE
Procedure
- Prepare 1% agarose gel (2g agarose + 20 ml 1xTAE)
- Use microwave to dissolve the agarose
- When it cools down to touchable temperature, add 2ul SYBR safe dye to the flask (10000x SYBR, 1ul for 10 mL 1xTAE)
- Pour the solution into wide teeth(4mm wide, 1 mm thick teeth) and cool it down
- Run gel (Well: 20ul max.)
- Move the tray and gel to the kit. Add TAE buffer until it covers up the gel.
- Transfer 15 ul RNA to a new PCR tube.
- Add loading dye. 0.5 ul dye + 2.5 ul cDNA.
- Add the rest of the samples carefully into the wells.
- Place the cover and plug in positive and negative wires.
- Start the voltage provider.
- Run the gel at 150 V until the dye line is approximately 75-80% of the way down the gel. A typical run time is about 1-1.5 hours, depending on the gel concentration and voltage.
- Visualize your DNA fragments with UV light.
- Bands of [1]Ptac-EGFP, [5]Lacl, [5]Ptac-hbd, [5]CRT, [5]TER, [6]pchA, [6]biosensor-EGFP
Record 25 Reverse Transcription of [1]&control MaterialsMethod
Equipment
- pET11a(control)
- [1]pET28a-Ptac-EGFP
Procedure
- Add 8ul cDNA synthetic master mix (5x), 30ul RNase-free water, 2ul RNA(control) into a PCR tube. Adjust total volume to 40ul.
- Add 8ul cDNA synthetic master mix (5x), 20ul RNase-free water, 8ul RNA[1] into a PCR tube. Adjust total volume to 40ul.
- Mix by pipetting.
- Preheat the PCR machine to 42°C.
- Transfer the PCR tubes to a PCR machine.
- Incubate, 42°C, 10 minutes for reverse transcription.
- Incubate, 80°C, 10 minutes to inactivate the reverse transcriptase and terminate the reaction.
Record 26 qPCR of [3][4][5][6][7] and control MaterialsMethod1 table
Equipment
- [3]pET-T7-PTB-BUK
- [4]pET28a-Lacl-Ppcha-Ptac-EGFP
- [5]pET28a-Lacl-Ppcha-PtaC-HBD-CRT-TER
- [6]pET28a-pchA-PpchA-PLEE1-EGFP
- [7]pET28a-T7-HBD-CRT-TER
- c: pET11a(control)
Procedure
- Calculate the volume of cDNA needed to add. Total cDNA added should be 1ug
- In this test, we use 1 ul of cDNA (contain 1ug of cDNA)
- The total sample volume should add up to 300 ul.
- Dilute the primer to 10 uM. Originally it’s 100 uM, so 1 ul primer : 9 ul H2O. If the primer is already 10 uM, skip this step.
- Prepare mixture of Master Mix (150ul), ddH2O (123 ul), primer (forward and reverse, in total 12 ul) in order.
- Add
- Use the PCR machine at 3F.
- The PCR takes ~2 hours. In the meantime, prepare agarose gel, 1xTAE buffer (~500 ml); find 10000x SYBR safe, loading dye and 1kb ladder (marker).
| 1 | 2 | 3 | 4 | 5 | 6 | 7 | 8 | 9 | 10 | 11 | 12 | ||
|---|---|---|---|---|---|---|---|---|---|---|---|---|---|
| 16S | c | c | c | [7] | [7] | [7] | LaCI | [4] | [4] | [4] | c | c | c |
| 16S | [6] | [6] | [6] | [5] | [5] | [5] | LaCI | [5] | [5] | [5] | c | c | c |
| 16S | [4] | [4] | [4] | [3] | [3] | [3] | PchA | [6] | [6] | [6] | c | c | c |
| cRT | [7] | [7] | [7] | c | c | c | PchA | [4] | [4] | [4] | c | c | c |
| cRT | [5] | [5] | [5] | c | c | c | BIO | [6] | [6] | [6] | c | c | c |
| TER | [7] | [7] | [7] | c | c | c | buk | [3] | [3] | [3] | c | c | c |
| TER | [5] | [5] | [5] | c | c | c | ptb | [3] | [3] | [3] | c | c | c |
| hbd | [7] | [7] | [7] | c | c | c | ptb | buk | pchA | LaCI | TER | cRT |
03 Month group
July 2026
- Records
- 33
- Tables
- 6
- Figures
- 0
Record 01 RNA Extraction + Reverse Transcription MaterialsMethod
Equipment
- [2]pET28a-pNorVb-EGFP EcN Culture
- LB broth
- Ampicillin
- Polystyrene Round-Bottom Tube
- Incubator (shaking, 220 rpm, 37°C)
- IPTG
- 1.5 mL microtube
- Centrifuge
- TRizol reagent
- Chloroform
- Fume hood
- 100% isopropanol
- 75% ethanol
- 80% ethanol
- RNase-free water
- cDNA synthetic master mix (5x)
- PCR tube
- PCR machine (thermal cycler)
Procedure
- Measure 10mL LB broth, pipette 5mL of LB broth and 5 uL of Ampicillin into each Polystyrene Round-Bottom Tube.
- Place 50uL [2] into each tube.
- Place onto the incubator (at 220 rpm and 37C) wait od 600 until 0.5-0.6.
- add iptg 5ul into each tube wait 2.5-4 hour
- add 1ml [2] into a new 1.5mL microtube
- Cfg. (5000rpm, 3min, 4°C)
- Remove medium
- Add 1ml TRizol per well and pipet/wash the well for several times
- Transfer the mixture into a new 1.5ml or 2ml microtube
- RT, 5min incubation
- Add 0.2ml chloroform at fume hood and invert by hand for 10s (or vortex to mix)
- RT, 3min incubation
- Cfg. (12000xg, 15min, 4°C)
- Transfer the aqueous layer to a new 1.5ml microtube
- Add 0.5ml 100% isopropanol to the aqueous layer
- RT, 10 min incubation
- Cfg. (12000xg, 10 min, 4°C)
- Remove the supernatant and wash the RNA pellet with 1ml 75% ethanol.
- Invert the sample
- Cfg. (14000rpm, 5min, 4°C), remove the supernatant
- Remove the supernatant and wash the RNA pellet with 1ml 80% ethanol.
- Invert the sample
- Repeat step 20~22 for once
- Quick Cfg. (14000rpm, 5min, 4°C), remove the supernatant
- Dry the pellet for 10~20min, RT
- Resuspend the RNA pellet with 30~60ul RNase-free water
- Add 8ul cDNA synthetic master mix (5x), 30.2ul RNase-free water, 1.8ul RNA[2] into a PCR tube. Adjust total volume to 40ul.
- Mix by pipetting.
- Preheat the PCR machine to 42°C.
- Transfer the PCR tubes to a PCR machine.
- Incubate, 42°C, 10 minutes for reverse transcription.
- Incubate, 80°C, 10 minutes to inactivate the reverse transcriptase and terminate the reaction.
Record 02 qPCR of [1][2][5][6][7] MaterialsMethod1 table
Equipment
- [1]pET28a-Ptac-EGFP
- [2]pET28a-pNorVb-EGFP
- [5]pET28a-Lacl-Ppcha-PtaC-HBD-CRT-TER
- [6]pET28a-pchA-PpchA-PLEE1-EGFP
- [7]pET28a-T7-HBD-CRT-TER
- c: pET11a(control)
Procedure
- Calculate the volume of cDNA needed to add. Total cDNA added should be 1ug
- In this test, we use 2.2 ul of cDNA (contain 1ug of cDNA)
- The total sample volume should add up to 300 ul.
- Prepare mixture of Master Mix (150ul), ddH2O (123 ul), primer (forward and reverse, in total 12 ul) in order.
- Add
- Use the PCR machine at 3F.
- The PCR takes ~2 hours. In the meantime, prepare agarose gel, 1xTAE buffer (~500 ml); find 10000x SYBR safe, loading dye and 1kb ladder (marker).
| 1 | 2 | 3 | 4 | 5 | 6 | 7 | 8 | 9 | 7 | 8 | 9 | 10 | 11 | 12 | ||
|---|---|---|---|---|---|---|---|---|---|---|---|---|---|---|---|---|
| NO-GFP | c | c | c | [2] | [2] | [2] | 16S | c | c | c | [1] | [1] | [1] | |||
| ptac-hbd | c | c | c | [5] | [5] | [5] | 16S | [2] | [2] | [2] | [4] | [4] | [4] | |||
| Bio | c | c | c | [6] | [6] | [6] | 16S | [5] | [5] | [5] | [6] | [6] | [6] | |||
| ptac-egfp | c | c | c | [1] | [1] | [1] | [4] | [4] | [4] | 16S | [7] | [7] | [7] | |||
| cRT | c | c | c | [5] | [5] | [5] | [7] | [7] | [7] | Bio | TER | BUK | ||||
| TER | c | c | c | [5] | [5] | [5] | [7] | [7] | [7] | pcha | cRT | hbd | ||||
| TER | c | c | c | [5] | [5] | [5] | [4] | [4] | [4] | NO-GFP | ptb | pNorVb | ||||
| hbd | c | c | c | [6] | [6] | [6] | [4] | [4] | [4] | ptac-egfp | ptac-hbd | LacI |
Record 03 Protein extraction of [2][5][6] Recorded notes
- [2] pNorVb-EGFP EcN
- [5]pET28a-Lacl-Ppcha-PtaC-HBD-CRT-TER EcN
- [6]pET28a-pchA-PpchA-PLEE1-EGFP EcN
- PBS
- RIPA buffer + protease inhibitor
Procedure
- Take 5 mL culture as bacterial culture for test, pour the rest into a falcon centrifuging tube and balance their weight.
- Place the cell culture dish in ice and wash the cells with ice-cold PBS.
- Discard Supernatant by centrifugation, then add ice-cold RIPA buffer+protease inhibitor (1 ml per culture).
- gently transfer the cell suspension into a precooled microcentrifuge tube.
- Maintain constant agitation for 30 min at 4°C.
- Spin at 16,000 x g for 20 min in a 4°C precooled centrifuge.
- Gently remove the centrifuge tube and place it on ice.
- Transfer the supernatant to a fresh tube, also kept on ice, and discard the pellet.
- Remove a small volume (10-20 ul) of lysate to perform a BCA assay. Determine the protein concentration for each cell lysate.
- Repeated freeze and thaw cycles cause protein degradation and should be avoided.
- Boil each cell lysate in a sample buffer at 95°C for 5 min.
Record 04 BCA MaterialsMethod1 table
Equipment
- BCA kit
- 96-well microplate
- [2] pNorVb-EGFP protein
- [5]pET28a-Lacl-Ppcha-PtaC-HBD-CRT-TER protein
- [6]pET28a-pchA-PpchA-PLEE1-EGFP protein
Procedure
- Prepare the BCA working reagent by mixing 2000µL BCA reagent A and 40µL BCA reagent B (50:1) thoroughly.
- Add BSA standard solutions according to the table below:
| well num | 0 | 1 | 2 | 3 | 4 | 5 | 6 | 7 |
|---|---|---|---|---|---|---|---|---|
| BSA standard(µL) | 0 | 1 | 2 | 4 | 8 | 12 | 16 | 20 |
| distilled water (µL) | 20 | 19 | 18 | 16 | 12 | 8 | 4 | 0 |
| BCA working reagent (µL) | 200 | 200 | 200 | 200 | 200 | 200 | 200 | 200 |
- Mix well by pipetting.
- Add 20 µL of the supernatant from [2][5][6] protein to each well, pipet thoroughly.
- Incubate the plate at 37°C for 20 minutes.
- Measure the absorbance at 562 nm using a microplate reader.
Record 05 qPCR MaterialsMethod1 table
Equipment
- [1]pET28a-Ptac-EGFP
- [2]pET28a-pNorVb-EGFP
- [5]pET28a-Lacl-Ppcha-PtaC-HBD-CRT-TER
- [6]pET28a-pchA-PpchA-PLEE1-EGFP
- [7]pET28a-T7-HBD-CRT-TER
- c: pET11a(control)
Procedure
- Calculate the volume of cDNA needed to add. Total cDNA added should be 1ug
- In this test, we use 2.2 ul of cDNA (contain 1ug of cDNA)
- The total sample volume should add up to 300 ul.
- Prepare mixture of Master Mix (150ul), ddH2O (123 ul), primer (forward and reverse, in total 12 ul) in order.
- Add
- Use the PCR machine at 3F.
- The PCR takes ~2 hours. In the meantime, prepare agarose gel, 1xTAE buffer (~500 ml); find 10000x SYBR safe, loading dye and 1kb ladder (marker).
| 1 | 2 | 3 | 4 | 5 | 6 | 7 | 8 | 9 | 10 | 11 | 12 | |||
|---|---|---|---|---|---|---|---|---|---|---|---|---|---|---|
| 16S | c | c | c | [1] | [1] | [1] | [2] | [2] | [2] | [4] | [4] | [4] | ||
| ptac-egfp | c | c | c | [1] | [1] | [1] | [4] | [4] | [4] | [5] | [5] | [5] | ||
| NO-GFP | c | c | c | [2] | [2] | [2] | ptac-hbd | c | c | c | [5] | [5] | [5] | |
| 16S | c | c | c | [1] | [1] | [1] | [3] | [3] | [3] | [4] | [4] | [4] | ||
| ptac-egfp | c | c | c | [1] | [1] | [1] | [4] | [4] | [4] | 16S | [5] | [5] | [5] | |
| BUK | c | c | c | [3] | [3] | [3] | ptb | c | c | c | [3] | [3] | [3] | |
| pcha | c | c | c | [4] | [4] | [4] | [5] | [5] | [5] | |||||
| TER | pchA | CRT | hbd | LacI | Bio-EGFP | pNorVb | ptac-hbd | ptac-egfp | buk | ptb |
Record 06 BCA of [1][3][4][5][7] and control MaterialsMethod1 table
Equipment
- BCA kit
- 96-well microplate
- [1]pET28a-Ptac-EGFP Protein
- [3]pET-T7-PTB-BUK Protein
- [4]pET28a-Lacl-Ppcha-Ptac-EGFP Protein
- [5]pET28a-Lacl-Ppcha-PtaC-HBD-CRT-TER Protein
- [7]pET28a-T7-HBD-CRT-TER Protein
- c1: pET11a(control)
- c2: BL21-pET-GFP
Procedure
- Prepare the BCA working reagent by mixing 3500µL BCA reagent A and 70µL BCA reagent B (50:1) thoroughly.
- Add BSA standard solutions according to the table below.
- Mix well by pipetting.
- Add 20 µL of the supernatant from [1][3][4][5][7] protein and control group to each well, pipet thoroughly.
- Incubate the plate at 37°C for 20 minutes.
- Measure the absorbance at 562 nm using a microplate reader.
| well num | 0 | 1 | 2 | 3 | 4 | 5 | 6 | 7 |
|---|---|---|---|---|---|---|---|---|
| BSA standard(µL) | 0 | 1 | 2 | 4 | 8 | 12 | 16 | 20 |
| distilled water (µL) | 20 | 19 | 18 | 16 | 12 | 8 | 4 | 0 |
| BCA working reagent (µL) | 200 | 200 | 200 | 200 | 200 | 200 | 200 | 200 |
Record 07 RNA Extraction + Reverse Transcription MaterialsMethod
Equipment
- [2]pET28a-pNorVb-EGFP EcN Culture
- LB broth
- Ampicillin
- Polystyrene Round-Bottom Tube
- Incubator (shaking, 220 rpm, 37°C)
- IPTG
- 1.5 mL microtube
- Centrifuge
- TRizol reagent
- Chloroform
- Fume hood
- 100% isopropanol
- 75% ethanol
- 80% ethanol
- RNase-free water
- cDNA synthetic master mix (5x)
- PCR tube
- PCR machine (thermal cycler)
Procedure
- Measure 10mL LB broth, pipette 5mL of LB broth and 5 uL of Ampicillin into each Polystyrene Round-Bottom Tube.
- Place 50uL [2] into each tube.
- Place onto the incubator (at 220 rpm and 37C) wait od 600 until 0.5-0.6.
- add iptg 5ul into each tube wait 2.5-4 hour
- add 1ml [2] into a new 1.5mL microtube
- Cfg. (5000rpm, 3min, 4°C)
- Remove medium
- Add 1ml TRizol per well and pipet/wash the well for several times
- Transfer the mixture into a new 1.5ml or 2ml microtube
- RT, 5min incubation
- Add 0.2ml chloroform at fume hood and invert by hand for 10s (or vortex to mix)
- RT, 3min incubation
- Cfg. (12000xg, 15min, 4°C)
- Transfer the aqueous layer to a new 1.5ml microtube
- Add 0.5ml 100% isopropanol to the aqueous layer
- RT, 10 min incubation
- Cfg. (12000xg, 10 min, 4°C)
- Remove the supernatant and wash the RNA pellet with 1ml 75% ethanol.
- Invert the sample
- Cfg. (14000rpm, 5min, 4°C), remove the supernatant
- Remove the supernatant and wash the RNA pellet with 1ml 80% ethanol.
- Invert the sample
- Repeat step 20~22 for once
- Quick Cfg. (14000rpm, 5min, 4°C), remove the supernatant
- Dry the pellet for 10~20min, RT
- Resuspend the RNA pellet with 30~60ul RNase-free water
- Add 8ul cDNA synthetic master mix (5x), 30.2ul RNase-free water, 1.8ul RNA[2] into a PCR tube. Adjust total volume to 40ul.
- Mix by pipetting.
- Preheat the PCR machine to 42°C.
- Transfer the PCR tubes to a PCR machine.
- Incubate, 42°C, 10 minutes for reverse transcription.
- Incubate, 80°C, 10 minutes to inactivate the reverse transcriptase and terminate the reaction.
Record 08 M1/M2 Polarization of Macrophage MaterialsMethod
Equipment
- RAW 264.7 macrophages
- 1M Butyrate stock solution
- PBS
- Cell culture medium
- Trypsin-EDTA (0.25%)
Procedure
Cell passaging
- Aspirate the old medium from the RAW macrophage culture.
- Wash the cells once with 5 mL PBS.
- Add 1 mL Trypsin-EDTA and incubate at 37°C for 3–5 minutes.
- Add 4 mL fresh serum-containing medium to neutralize the trypsin.
- Transfer the cell suspension to a 15 mL tube and centrifuge at 1000 rpm for 5 minutes.
- Remove the supernatant and resuspend the cell pellet in fresh medium.
- Count the cells using a hemocytometer.
Cell seeding
- Adjust the cell density to the required concentration (e.g., 1×10⁶ cells/mL).
- Seed the cells into the culture plates.
- Place the plates in a 37°C, 5% CO₂ incubator to allow cell attachment.
Drug preparation
Prepare intermediate dilutions from the 1M Butyrate stock
- 100 mM: 100 μL 1M stock + 900 μL PBS
- 10 mM: 100 μL 100 mM + 900 μL PBS
- 1 mM: 100 μL 10 mM + 900 μL PBS
- 100 μM: 100 μL 1 mM + 900 μL PBS
Prepare final treatment concentrations
- 10 mM: 20 μL 1M stock + 1980 μL medium
- 1 mM: 20 μL 100 mM + 1980 μL medium
- 100 μM: 20 μL 10 mM + 1980 μL medium
- 10 μM: 20 μL 1 mM + 1980 μL medium
- 1 μM: 20 μL 100 μM + 1980 μL medium
- Control: 2 mL fresh medium
Butyrate treatment
- Aspirate the old medium from the seeded plates.
- Add the prepared drug-containing media to the respective wells according to the experimental groups.
- Gently shake the plate to mix evenly.
- Return the plate to the 37°C, 5% CO₂ incubator for further incubation to induce M1/M2 polarization.
Record 09 Protein Extraction of [2][6] and control MaterialsMethod
Equipment
- BL21
- [2]pET28a-pNorVb-EGFP
- [6]pET28a-pchA-PpchA-PLEE1-EGFP
- PBS
- RIPA buffer + protease inhibitor
- Ice
Total culture volume: 10 mL
Procedure
- Take 5 mL culture as bacterial culture for test, pour the rest into a falcon centrifuging tube and balance their weight.
- Place the cell culture dish in ice and wash the cells with ice-cold PBS.
- Discard Supernatant by centrifugation, then add ice-cold RIPA buffer+protease inhibitor (1 ml per culture).
- gently transfer the cell suspension into a precooled microcentrifuge tube.
- Maintain constant agitation for 30 min at 4°C.
- Spin at 16,000 x g for 20 min in a 4°C precooled centrifuge.
- Gently remove the centrifuge tube and place it on ice.
- Transfer the supernatant to a fresh tube, also kept on ice, and discard the pellet.
- Remove a small volume (10-20 ul) of lysate to perform a BCA assay. Determine the protein concentration foreach cell lysate.
- Repeated freeze and thaw cycles cause protein degradation and should be avoided.
- Boil each cell lysate in sample buffer at 95°C for 5 min.
Record 10 qPCR of [2][3][4][5][6][7] and control MaterialsMethod
Equipment
- BL21 transformed:
- [2]pET28a-pNorVb-EGFP
- [3]pET-T7-PTB-BUK
- [4]pET28a-Lacl-Ppcha-Ptac-EGFP
- [5]pET28a-Lacl-Ppcha-PtaC-HBD-CRT-TER
- [6]pET28a-pchA-PpchA-PLEE1-EGFP
- [7]pET28a-T7-HBD-CRT-TER
- c: pET11a(control)
Procedure
- Calculate the volume of cDNA needed to add. Total cDNA added should be 1ug
- In this test, we use 1 ul of cDNA
- The total sample volume should add up to 300 ul.
- Dilute the primer to 10 uM. Originally it’s 100 uM, so 1 ul primer : 9 ul H2O. If the primer is already 10 uM, skip this step.
- Prepare mixture of Master Mix (150ul), ddH2O (123 ul), primer (forward and reverse, in total 12 ul) in order.
- Add
- Use the PCR machine at 3F.
- The PCR takes ~2 hours. In the meantime, prepare agarose gel, 1xTAE buffer (~500 ml); find 10000x SYBR safe, loading dye and 1kb ladder (marker).
Record 11 Western Blot of [2][3][4][5][6] (Day 1) MaterialsMethod
Equipment
- [2][3][4][5][6] protein
- pET11a protein
- pET-EGFP protein
- TBS
- Marker
- Loading buffer
- SDS-PAGE buffer
- PVDF membrane
- Transfer sandwich
- Transfer buffer
- Blocking buffer
- Primary antibody solution:
- GFP RABBIT: 1, 2, 4, 6
- HA RABBIT: 3, 5, 7
- C-MYC RABBIT: 5, 7
- FLAG MOUSE: 3, 5, 7
Procedure
Protein separation by gel electrophoresis
- Load 20uL of protein into the wells format SDS-PAGE gel, along with molecular weight markers.
- Run the gel for 120 min at 120 V.
Transferring the protein from the gel to the membrane
- Place the gel in 1x transfer buffer for 10-15 min.
- Assemble the transfer sandwich and make sure no air bubbles are trapped in the sandwich. The blot should be on the cathode and the gel on the anode.
- Place the cassette in the transfer tank and place an ice block in the tank.
- Transfer 1 hr in a coldroom at a constant current of 200 mA.
- Note: Transfer can also be done at 100 V for 30 min-2 hr, but the method needs to be optimized for proteins of different sizes.
Primary Antibody incubation
- Rinse the membrane with three washes with TBST.
- Block in 2.5% (w/v) non fat milk in TBST at room temperature for 1 hr.
- Incubate overnight in the primary antibody solution against the target protein at 4°C.
Record 12 Western Blot of [2][3][4][5][6] (Day 2) MaterialsMethod
Equipment
- TBST
- Secondary antibody
- ECL chemiluminescence
- Imager
Procedure
Secondary Antibody incubation
- Rinse the blot 3-5 times for 5 min with TBST.
- Incubate in the HRP-conjugated secondary antibody solution for 1 hr at room temperature.
- Note: The antibody can be diluted using 5% skim milk in TBST.
- Rinse the blot 3-5 times for 5 min with TBST.
Imaging
- Apply the chemiluminescent substrate to the blot according to the manufacturer's recommendation.
- Capture the chemiluminescent signals using a CCD camera-based imager.
- Use image analysis software to read the band intensity of the target proteins.
Record 13 Competent cells EcN (the previous is contaminated) MaterialsMethod
Equipment
- Overnight EcN
- LB broth
- Calcium chloride solution (15mM)
- Calcium chloride solution with 15% glycerol
- Ice
Procedure
- Place 100mL Calcium chloride solution (15mM) and 100mL Calcium chloride solution with 15% glycerol on ice.
- Transfer 5mL of overnight BL21 into 500mL of LB broth and incubate at 220 rpm until OD600 rises to 0.5-0.6. (~10:00am)
- 11:00 0.025
- 12:00 0.100
- 12:30 0.215
- 13:00 0.365
- 13:30 0.556
- Transfer the LB cell to two 250mL centrifuge tubes.
- Tare and weigh the two 250mL centrifuge tubes until they have less than 1% difference by mass.
- Centrifuge the culture at 4,000 x g for 5 minutes at 4 °C
- Carefully decant and discard the supernatant.
- Gently resuspend the cell pellet with 10 mL of cold, sterile 100 mM calcium chloride (CaCl2) solution.
- Place the two 250mL centrifuge tubes in ice for 30 minutes
- Centrifuge the tubes at 4,000 x g for 5 minutes at 4 °C
- Carefully decant and discard the supernatant.
- Gently resuspend the cell pellet with 10 mL of cold, sterile calcium chloride (CaCl2) and 15% glycerol solution.
- Divide the competent cells into small aliquots (100 μl each) and pipette them in sterile microcentrifuge tubes.
- Flash-freeze the aliquots in liquid nitrogen and store them at -80 °C until needed.
Record 14 Plasmid Transformation of [3] MaterialsMethod
Equipment
- c: pET11a(control)
- [3]pET-T7-PTB-BUK
- LB agar plate with Kanamycin
- LB agar plate with Ampicilin and Kanamycin
- Ice
- LB broth
- Competent cell (EcN)
Procedure
- Add 100 ng of plasmid to the cells. Pipette gently. DO NOT vortex.
- Place mixture on ice for 20 minutes.
- Heat shock the mixture at 42°C for 1 minute.
- Place the mixture on ice for 2 minutes.
- Add 900μL of LB broth to the mixture. Pipette gently to mix.
- Incubate the mixture at 37°C for 1 hour. Shake at 300 rpm.
- Centrifuge at 4°C 4.5rpm for 5min
- Remove supernatant
- Resuspend cell pellet
- Add 50μL of mixture to 1 plates (50μL each). Spread evenly.
- Collect the cells using centrifugation and remove 700μL of LB. Do not remove the cells.
- Pipette gently to mix. Add 100 μL of mixture to each plate (it is 4.5x concentration). Streak the plate.
- Incubate the plates overnight at 37°C. If it is not immediately used, store in 4°C refrigerator.
Record 15 Protein extraction pf [1][4][5][6][7] MaterialsMethod
Equipment
- [1]pET28a-Ptac-EGFP
- [4]pET28a-Lacl-Ppcha-Ptac-EGFP
- [5]pET28a-Lacl-Ppcha-PtaC-HBD-CRT-TER
- [6]pET28a-pchA-PpchA-PLEE1-EGFP
- [7]pET28a-T7-HBD-CRT-TER
- IPTG Stock Solution
- PBS
- RIPA buffer + protease inhibitor
Procedure
- Take 5 mL culture as bacterial culture for test, pour the rest into a falcon centrifuging tube and balance their weight.
- Place the cell culture dish in ice and wash the cells with ice-cold PBS.
- Discard Supernatant by centrifugation, then add ice-cold RIPA buffer+protease inhibitor (1 ml per culture).
- gently transfer the cell suspension into a precooled microcentrifuge tube.
- Maintain constant agitation for 30 min at 4°C.
- Spin at 16,000 x g for 20 min in a 4°C precooled centrifuge.
- Gently remove the centrifuge tube and place it on ice.
- Transfer the supernatant to a fresh tube, also kept on ice, and discard the pellet.
- Remove a small volume (10-20 ul) of lysate to perform a BCA assay. Determine the protein concentration foreach cell lysate.
- Repeated freeze and thaw cycles cause protein degradation and should be avoided.
- Boil each cell lysate in sample buffer at 95°C for 5 min.
Record 16 BCA of [1][4][5][6][7] MaterialsMethod1 table
Equipment
- BCA kit
- 96-well microplate
- [1]pET28a-Ptac-EGFP protein
- [4]pET28a-Lacl-Ppcha-Ptac-EGFP protein
- [5]pET28a-Lacl-Ppcha-PtaC-HBD-CRT-TER protein
- [6]pET28a-pchA-PpchA-PLEE1-EGFP protein
- [7]pET28a-T7-HBD-CRT-TER protein
Procedure
- Prepare the BCA working reagent by mixing 2000µL BCA reagent A and 40µL BCA reagent B (50:1) thoroughly.
- Add BSA standard solutions according to the table below.
- Mix well by pipetting.
- Add 20 µL of the supernatant from [2] protein to a well, pipet thoroughly.
- Incubate the plate at 37°C for 20 minutes.
- Measure the absorbance at 562 nm using a microplate reader.
| well num | 0 | 1 | 2 | 3 | 4 | 5 | 6 | 7 |
|---|---|---|---|---|---|---|---|---|
| BSA standard(µL) | 0 | 1 | 2 | 4 | 8 | 12 | 16 | 20 |
| distilled water (µL) | 20 | 19 | 18 | 16 | 12 | 8 | 4 | 0 |
| BCA working reagent (µL) | 200 | 200 | 200 | 200 | 200 | 200 | 200 | 200 |
Record 17 Protein extraction MaterialsMethod
Equipment
- [2]pET28a-pNorVb-EGFP
- [3]pET-T7-PTB-BUK
- IPTG Stock Solution
- PBS
- RIPA buffer + protease inhibitor
Procedure
- Take 5 mL culture as bacterial culture for test, pour the rest into a falcon centrifuging tube and balance their weight.
- Place the cell culture dish in ice and wash the cells with ice-cold PBS.
- Discard Supernatant by centrifugation, then add ice-cold RIPA buffer+protease inhibitor (1 ml per culture).
- gently transfer the cell suspension into a precooled microcentrifuge tube.
- Maintain constant agitation for 30 min at 4°C.
- Spin at 16,000 x g for 20 min in a 4°C precooled centrifuge.
- Gently remove the centrifuge tube and place it on ice.
- Transfer the supernatant to a fresh tube, also kept on ice, and discard the pellet.
- Remove a small volume (10-20 ul) of lysate to perform a BCA assay. Determine the protein concentration foreach cell lysate.
- Repeated freeze and thaw cycles cause protein degradation and should be avoided.
- Boil each cell lysate in sample buffer at 95°C for 5 min.
Record 18 Butyrate Sensing Test MaterialsMethodDiscussion1 table
Equipment
- [4]pET28a-Lacl-Ppcha-Ptac-EGFP
- [5]pET28a-Lacl-Ppcha<----->PtaC-TER-CRT-HBD
- [6]pET28a-pchA-PpchA-PLEE1-EGFP
- Empty vector control: BL21 with pET-11a
- M9 minimal medium + 0.4% glucose
- LB broth
- Sodium butyrate
- Ampicillin (100 µg/mL) and Kanamycin (50 µg/mL) — for dual selection of two
- NaCl
Procedure
- Dilute the culture 1:75 into 50 mL of fresh M9 + 0.4% glucose
- Incubate at 37°C, 220 rpm. Measure OD600 every 45–60 minutes.
- When OD600 reaches 0.6–0.8, centrifuge the cells gently (3000 x g, 5 min),wash once with fresh M9, and resuspend in M9 to a final OD600 of 0.1.
Preparation of butyrate inducer
- Prepare a sterile stock solution of sodium butyrate.
- Dilute the stock solution with sterile water to prepare a concentration series.
- Suggested final concentrations are: 0.25, 0.5, 1.25, 5 mM.
- Stock solutions will have concentrations of 1, 2, 5, 20mM.
- To prepare sodium chloride solution, repeat the procedures and produce a
- series of the same concentrations.
Induction and measurement
- Add 50 µL of each sodium butyrate solution into the wells containing 150 µL
- bacterial culture.
- For the 0 mM group, add 50 µL sterile M9 medium.
- Group A (Experimental): 150 µL of Engineered EcN + 50 µL sodium butyrate
solution (repeat this step for each concentration)
- Group B (Experimental with NaCl): 150 µL of Engineered EcN + 50 µL sodium
chloride solution (repeat this step for each concentration). This step eliminates
the effect of sodium.
- Group C (Empty vector): 150 µL of Empty Vector Control + 50 µL sodium
butyrate solution (repeat this step for each concentration)
- Group D (Blank): 200 µL of sterile M9 Medium only (Used to subtract
background absorbance and autofluorescence)
Set the plate reader as follows
- Absorbance: 600nm
- Fluorescence: Excitation 485nm, Emission 515nm
- Gain: Set to "Auto" for the first run, or manually set it using the 1000 µM well to ensure the signal doesn't saturate (> 60,000 RFU)
- Run for 12 hours total: incubate for the first 4 hours, then spot and measure every 30 minutes.
| Row/Col | 1 | 2 | 3 | 4 | 5 | 6 | 7 | 8 | 9 | 10 | 11 |
|---|---|---|---|---|---|---|---|---|---|---|---|
| Final Conc. (Stock) | 0.25 mM (1 mM) | 0.5 mM (2 mM) | 1.25 mM (5 mM) | 5 mM (20 mM) | 0.25 mM (1 mM) | 0.5 mM (2 mM) | 1.25 mM (5 mM) | 5 mM (20 mM) | |||
| A: [4] + Sodium Butyrate | 0.25 mM | 0.5 mM | 1.25 mM | 5 mM | 0.25 mM | 0.5 mM | 1.25 mM | 5 mM | |||
| B: [6] + Sodium Butyrate | 0.25 mM | 0.5 mM | 1.25 mM | 5 mM | 0.25 mM | 0.5 mM | 1.25 mM | 5 mM | |||
| C: [4] + NaCl | 0.25 mM | 0.5 mM | 1.25 mM | 5 mM | 0.25 mM | 0.5 mM | 1.25 mM | 5 mM | |||
| D: [6] + NaCl | 0.25 mM | 0.5 mM | 1.25 mM | 5 mM | 0.25 mM | 0.5 mM | 1.25 mM | 5 mM | |||
| E: Blank (M9) | M9 | M9 | M9 | M9 | M9 | M9 | M9 | M9 | |||
| F: Empty vector + NaCl | 0.25 mM | 0.5 mM | 1.25 mM | 5 mM | 0.25 mM | 0.5 mM | 1.25 mM | 5 mM |
Results
The data obtained from this experiment were highly variable and did not yield interpretable results.
- The measurements showed massive fluctuations over time, with no consistent trend observable across any of the sample groups.
- The Blank group readings were higher than those of the experimental groups. After subtracting blank group values, the net readings for the experimental groups yielded negative numbers, which is invalid.
Discussion and Failure Analysis
- No positive control: Without a positive control, we cannot confirm whether the induction system itself is functional.
- No dynamic OD600 monitoring: We cannot distinguish between lack of expression and cell death or growth arrest. If cells died after induction, even a functional promoter would yield no fluorescence.
- The PpchA or PpchA‑PLEE1 promoters may exhibit very weak activity, requiring extended periods to accumulate sufficient fluorescent protein above the detection threshold.
Record 19 Western Blot of [1][2][3][4][5][6][7] (Day 1) MaterialsMethod
Equipment
- [1][2][3][4][5][6][7] protein
- pET11a protein
- pET-EGFP protein
- TBS
- Marker
- Loading buffer
- SDS-PAGE buffer
- PVDF membrane
- Transfer sandwich
- Transfer buffer
- Blocking buffer
- Primary antibody solution:
- GFP RABBIT: 1, 2, 4, 6
- HA RABBIT: 3, 5, 7
- C-MYC RABBIT: 5, 7
- FLAG MOUSE: 3, 5, 7
Procedure
Protein separation by gel electrophoresis
- Load 20uL of protein into the wells format SDS-PAGE gel, along with molecular weight markers.
- Run the gel for 120 min at 120 V.
Transferring the protein from the gel to the membrane
- Place the gel in 1x transfer buffer for 10-15 min.
- Assemble the transfer sandwich and make sure no air bubbles are trapped in the sandwich. The blot should be on the cathode and the gel on the anode.
- Place the cassette in the transfer tank and place an ice block in the tank.
- Transfer 1 hr in a coldroom at a constant current of 200 mA.
- Note: Transfer can also be done at 100 V for 30 min-2 hr, but the method needs to be optimized for proteins of different sizes.
Primary Antibody incubation
- Rinse the membrane with three washes with TBST.
- Block in 2.5% (w/v) non fat milk in TBST at room temperature for 1 hr.
- Incubate overnight in the primary antibody solution against the target protein at 4°C.
Record 20 Western Blot of [1][2][3][4][5][6][7] (Day 2) MaterialsMethod
Equipment
- TBST
- Secondary antibody
- ECL chemiluminescence
- Imager
Procedure
Secondary Antibody incubation
- Rinse the blot 3-5 times for 5 min with TBST.
- Incubate in the HRP-conjugated secondary antibody solution for 1 hr at room temperature.
- Note: The antibody can be diluted using 5% skim milk in TBST.
- Rinse the blot 3-5 times for 5 min with TBST.
Imaging
- Apply the chemiluminescent substrate to the blot according to the manufacturer's recommendation.
- Capture the chemiluminescent signals using a CCD camera-based imager.
- Use image analysis software to read the band intensity of the target proteins.
Record 21 Bacteria survival test MaterialsMethod
Equipment
- [5]pET28a-Lacl-Ppcha-PtaC-HBD-CRT-TER
- pET-11a
- Centrifuge
- PBS
- LB broth
- Simulated intestinal fluid
- Flasks
- Polystyrene tubes
- Antibiotic
- Anaerobic bag
- Incubator
Procedure
- Divide [5]pET28a-Lacl-Ppcha-PtaC-HBD-CRT-TER and pET-11a each into three portions and centrifuge them at 4500 rpm for 15 minutes.
- Discard the supernatant.
- Resuspend the bacterial pellet in the three portions in 1 mL PBS, LB broth, and simulated intestinal fluid, respectively.
- Prepare four flasks and two polystyrene tubes.
- For two of the flasks, add 13 mL PBS and 1 bacterial sample, with the corresponding antibiotic.
- For two of the flasks, add 13 mL LB broth and 1 mL bacterial sample, with the corresponding antibiotic.
- For the two polystyrene tubes, add 5 mL simulated intestinal fluid and 0.4 mL the bacterial sample, with the corresponding antibiotic, and seal the tubes in an anaerobic bag.
- Incubate the samples at 220 rpm, 37℃ overnight.
Record 22 Butyrate sensing test MaterialsMethod
Equipment
- M9 medium
- Glucose
- Bacterial sample (or cell pellet)
- IPTG
- pET28a-Lacl-Ppcha-Ptac-EGFP
- pET28a-Lacl-Ppcha-PtaC-HBD-CRT-TER
- pET28a-pchA-PpchA-PLEE1-EGFP
- pET-11a
- Sodium butyrate
- NaCl
- Polystyrene tubes
- Incubator (shaking, 220 rpm, 37°C)
- Centrifuge
Procedure
- Centrifuge the bacteria samples 15 minutes at 4500 rpm, discard supernatant.
- Prepare M9 medium with 0.4% glucose. The volume of M9 medium added and the bacterial sample used should be 50:1.
- Resuspend cell pellet in M9 medium, and transfer the bacterial sample to the larger portion of M9 medium.
- Grow the bacteria until OD600 grows to 0.6, where inducers can be added.
- Add IPTG to [4]pET28a-Lacl-Ppcha-Ptac-EGFP, [5]pET28a-Lacl-Ppcha-PtaC-HBD-CRT-TER, [6]pET28a-pchA-PpchA-PLEE1-EGFP and pET-11a
- Add sodium butyrate or NaCl to [4]pET28a-Lacl-Ppcha-Ptac-EGFP, [5]pET28a-Lacl-Ppcha-PtaC-HBD-CRT-TER, [6]pET28a-pchA-PpchA-PLEE1-EGFP and pET-11a as following:
- For each plasmid, prepare 9 polystyrene tubes, each containing 1500 μL of bacterial sample and 500 μL of sodium butyrate solution or NaCl solution (concentrations are 0, 8, 20, 80, 160 mM). Each tube has a different concentration of sodium butyrate or NaCl.
- Incubate the tubes at 220rpm and 37℃
Record 23 Protein extraction of [3][3+7] MaterialsMethod
Equipment
- [3] EcN
- [3] + [7] EcN
- PBS
- RIPA buffer + protease inhibitor
Procedure
- Take 10 mL culture as bacterial culture for test, pour the rest into a falcon centrifuging tube and balance their weight.
- Place the cell culture dish in ice and wash the cells with ice-cold PBS.
- Centrifuge.
- Discard the supernatant, then add ice-cold RIPA buffer + protease inhibitor (500 uL per culture).
- gently transfer the cell suspension into a precooled microcentrifuge tube.
- Maintain constant agitation for 30 min at 4°C.
- Sonicate cells.
- Spin at 16,000 x g for 20 min in a 4°C precooled centrifuge.
- Gently remove the centrifuge tube and place it on ice.
- Transfer the supernatant to a fresh tube, also kept on ice, and discard the pellet.
- Remove a small volume (10-20 ul) of lysate to perform a BCA assay. Determine the protein concentration for each cell lysate.
- Repeated freeze and thaw cycles cause protein degradation and should be avoided.
- Boil each cell lysate in a sample buffer at 95°C for 10 min.
Record 24 Plasmid Transformation of [3][5] MaterialsMethod
Equipment
- [3]pET-T7-PTB-BUK
- [5]pET28a-Lacl-Ppcha-PtaC-HBD-CRT-TER
- LB agar plate with Kanamycin
- LB agar plate with Ampicilin and Kanamycin
- Ice
- LB broth
- Competent cell (EcN)
Procedure
- Add 100 ng of plasmid to the cells. Pipette gently. DO NOT vortex.
- Place mixture on ice for 20 minutes.
- Heat shock the mixture at 42°C for 1 minute.
- Place the mixture on ice for 2 minutes.
- Add 900μL of LB broth to the mixture. Pipette gently to mix.
- Incubate the mixture at 37°C for 1 hour. Shake at 300 rpm.
- Centrifuge at 4°C 4.5rpm for 5min
- Remove supernatant
- Resuspend cell pellet
- Add 50μL of mixture to 1 plate (50μL each). Spread evenly.
- Collect the cells using centrifugation and remove 700μL of LB. Do not remove the cells.
- Pipette gently to mix. Add 100 μL of mixture to each plate (it is 4.5x concentration). Streak the plate.
- Incubate the plates overnight at 37°C. If it is not immediately used, store in 4°C refrigerator.
Record 25 Butyrate sensing test MaterialsMethod
Equipment
- clear 96-well plate
- plate reader
- black 96-well plate
- centrifuge
- refrigerator (4°C)
Procedure
- For all plasmids, test OD600 values using a clear 96-well plate and a plate reader, extracting and testing 200 μL for each sample
- For [4]pET28a-Lacl-Ppcha-Ptac-EGFP, [6]pET28a-pchA-PpchA-PLEE1-EGFP, pET-11a, test fluorescence level using a black 96-well plate and a plate reader, extracting and testing 200 μL for each sample
- For [5]pET28a-Lacl-Ppcha-PtaC-HBD-CRT-TER, take 500 μL for each sample and centrifuge at 4500 rpm for 15 minutes.
- After centrifugation, collect the supernatant and store in 4℃ for future use
- These procedures are repeated at 16:00
Record 26 Bacterial survival test MaterialsMethod
Equipment
- [5]pET28a-Lacl-Ppcha-PtaC-HBD-CRT-TER
- ampicillin agar plates
- kanamycin agar plates
- Incubator
Procedure
- Prepare 3 agar plates with ampicillin and 3 agar plates with kanamycin.
- For pET-11a, transfer 50 μL of bacterial samples to agar plates with ampicillin.
- For [5]pET28a-Lacl-Ppcha-PtaC-HBD-CRT-TER, transfer 50 μL of bacterial samples to agar plates with kanamycin.
- Test the OD600 value of the bacterial samples at the same time.
- Spread the plates and incubate the plates at 37℃
Record 27 Bacterial survival test MaterialsMethod
Record 28 Butyrate sensing test MaterialsMethod
Equipment
- [4]pET28a-Lacl-Ppcha-Ptac-EGFP
- [5]pET28a-Lacl-Ppcha-PtaC-HBD-CRT-TER
- [6]pET28a-pchA-PpchA-PLEE1-EGFP
- clear 96-well plate
- plate reader
- black 96-well plate
- centrifuge
- refrigerator
Procedure
- For all plasmids, test OD600 values using a clear 96-well plate and a plate reader, extracting and testing 200 μL for each sample
- For [4]pET28a-Lacl-Ppcha-Ptac-EGFP, [6]pET28a-pchA-PpchA-PLEE1-EGFP, pET-11a, test fluorescence level using a black 96-well plate and a plate reader, extracting and testing 200 μL for each sample
- For [5]pET28a-Lacl-Ppcha-PtaC-HBD-CRT-TER, take 500 μL for each sample and centrifuge at 4500 rpm for 15 minutes.
- After centrifugation, collect the supernatant and store in 4℃ for future use
- These procedures are repeated at 11:00 and 16:00
Record 29 Western Blot of [1][2][3][4][5][6][7] (Day 1) MaterialsMethod
Equipment
- [1][2][3][4][5][6][7] protein
- pET11a protein
- pET-EGFP protein
- TBS
- Marker
- Loading buffer
- SDS-PAGE buffer
- PVDF membrane
- Transfer sandwich
- Transfer buffer
- Blocking buffer
- Primary antibody solution:
- GFP RABBIT: 1, 2, 4, 6
- HA RABBIT: 3, 5, 7
- C-MYC RABBIT: 5, 7
- FLAG MOUSE: 3, 5, 7
Procedure
Protein separation by gel electrophoresis
- Load 20uL of protein into the wells format SDS-PAGE gel, along with molecular weight markers.
- Run the gel for 120 min at 120 V.
Transferring the protein from the gel to the membrane
- Place the gel in 1x transfer buffer for 10-15 min.
- Assemble the transfer sandwich and make sure no air bubbles are trapped in the sandwich. The blot should be on the cathode and the gel on the anode.
- Place the cassette in the transfer tank and place an ice block in the tank.
- Transfer 1 hr in a coldroom at a constant current of 200 mA.
- Note: Transfer can also be done at 100 V for 30 min-2 hr, but the method needs to be optimized for proteins of different sizes.
Primary Antibody incubation
- Rinse the membrane with three washes with TBST.
- Block in 2.5% (w/v) non fat milk in TBST at room temperature for 1 hr.
- Incubate overnight in the primary antibody solution against the target protein at 4°C.
Record 30 Western Blot of [1][2][3][4][5][6][7] (Day 2) MaterialsMethod
Equipment
- TBST
- Secondary antibody
- ECL chemiluminescence
- Imager
Procedure
Secondary Antibody incubation
- Rinse the blot 3-5 times for 5 min with TBST.
- Incubate in the HRP-conjugated secondary antibody solution for 1 hr at room temperature.
- Note: The antibody can be diluted using 5% skim milk in TBST.
- Rinse the blot 3-5 times for 5 min with TBST.
Imaging
- Apply the chemiluminescent substrate to the blot according to the manufacturer's recommendation.
- Capture the chemiluminescent signals using a CCD camera-based imager.
- Use image analysis software to read the band intensity of the target proteins.
Record 31 Butyrate production test 36, 24hr MaterialsMethod
Equipment
- [3] + [5]
- [3] + [7]
- pET11a
- IPTG
- M9 minimal medium + 0.4% glucose
- Ampicillin and Kanamycin
Procedure
- Inoculate the two groups (Engineered, Empty Vector), 50µL for each, from glycerol stocks into 5 mL LB broth with 5µL antibiotics (Amp 100 µg/mL / Kan 50 µg/mL).
- Incubate at 37°C, 250 rpm overnight.
- Centrifuge the overnight LB culture, and discard the supernatant
- Dilute the LB culture 1:50 into 8 mL of M9 + 0.4% glucose with 8µL antibiotics.
- Incubate at 37°C, 220 rpm. Measure OD600 every 45–60 minutes.
- When OD600 reaches 0.6, immediately add IPTG to a final concentration of 0.5 mM.
- Continue shaking for 36 hours, and collect samples at each time point: 24h, 36h.
Record 32 Butyrate production test 0, 12hr MaterialsMethod
Equipment
- [3] + [5]
- [3] + [7]
- pET11a
- M9 minimal medium + 0.4% glucose
- Ampicillin and Kanamycin
Procedure
- Inoculate the two groups (Engineered, Empty Vector), 50µL for each, from glycerol stocks into 5 mL LB broth with 5µL antibiotics (Amp 100 µg/mL / Kan 50 µg/mL).
- Incubate at 37°C, 250 rpm overnight.
- Centrifuge the overnight LB culture, and discard the supernatant
- Dilute the LB culture 1:50 into 8 mL of M9 + 0.4% glucose with 8µL antibiotics.
- Incubate at 37°C, 220 rpm. Measure OD600 every 45–60 minutes.
- When OD600 reaches 0.6, immediately add IPTG to a final concentration of 0.5 mM.
- Collect samples right after adding IPTG for time point 0h.
- Continue shaking for 12 hours, and collect samples at 12h.
Record 33 Bacterial survival test MaterialsMethod
Equipment
- Centrifuge
- M9 medium
- Glucose
- IPTG
- pET28a-Lacl-Ppcha-Ptac-EGFP
- pET28a-Lacl-Ppcha-PtaC-HBD-CRT-TER
- pET28a-pchA-PpchA-PLEE1-EGFP
- pET-11a
- Sodium butyrate
- NaCl
- Polystyrene tubes
- Incubator
Procedure
- Centrifuge the bacteria samples 15 minutes at 4500 rpm, discard supernatant.
- Prepare M9 medium with 0.4% glucose. The volume of M9 medium added and the bacterial sample used should be 50:1.
- Resuspend cell pellet in M9 medium, and transfer the bacterial sample to the larger portion of M9 medium.
- Grow the bacteria until OD600 grows to 0.6, where inducers can be added.
- Add IPTG to [4]pET28a-Lacl-Ppcha-Ptac-EGFP, [5]pET28a-Lacl-Ppcha-PtaC-HBD-CRT-TER, [6]pET28a-pchA-PpchA-PLEE1-EGFP and pET-11a
- Add sodium butyrate or NaCl to [4]pET28a-Lacl-Ppcha-Ptac-EGFP, [5]pET28a-Lacl-Ppcha-PtaC-HBD-CRT-TER, [6]pET28a-pchA-PpchA-PLEE1-EGFP and pET-11a as following:
- For each plasmid, prepare 9 polystyrene tubes, each containing 1500 μL of bacterial sample and 500 μL of sodium butyrate solution or NaCl solution (concentrations are 0, 8, 20, 80, 160 mM). Each tube has a different concentration of sodium butyrate or NaCl.
- Incubate the tubes at 220rpm and 37℃
04 Month group
August 2026
- Records
- 11
- Tables
- 4
- Figures
- 0
Record 01 Dynamic Test for Butyrate Concentration MaterialsMethod
Equipment
- [3]pET-T7-PTB-BUK + [5]pET28a-Lacl-Ppcha-PtaC-HBD-CRT-TER
- [3]pET-T7-PTB-BUK + [7]pET28a-T7-HBD-CRT-TER
- pET11a (control)
- IPTG
- LB broth
- Ampicillin and Kanamycin
- Sodium Butyrate
Procedure
- Inoculate the three groups (Engineered(3+7), Engineered(3+5), Empty Vector), each 50µL, from glycerol stocks into 5 mL LB broth with 5µL antibiotics (Amp 100 µg/mL / Kan 50 µg/mL).
- Incubate at 37°C, 250 rpm overnight.
- Prepare 500mM sodium butyrate stock.
- Dilute the LB culture 1:10 into 40 mL of fresh LB broth + antibiotics.
- Incubate at 37°C, 220 rpm. Measure OD600 every 45–60 minutes.
- When OD600 reaches 0.6–0.8, immediately add IPTG to a final concentration of 0.5 mM and add butyrate concentration 0mM, 10mM, 50mM,80mM.
- Continue shaking for 24 hours.
Record 02 Fluorescence test [4][6] MaterialsMethod2 tables
Equipment
- [1]pET28a-Ptac-EGFP (positive control)
- [4]pET28a-Lacl-Ppcha-Ptac-EGFP
- [6]pET28a-pchA-PpchA-PLEE1-EGFP
- Control: ECN
- M9 minimal medium + 0.4% glucose (negative control)
- LB broth
- Sodium butyrate
- Iptg
- plasmids
Procedure
- Dilute the culture 1:75 into 25 mL of fresh M9 + 0.4% glucose
- Incubate at 37°C, 220 rpm. Measure OD600 until OD600 reaches 0.6–0.8.
- Prepare 1M butyrate stock by adding 6 mL ddH2O with 0.44g of butyrate powder. (Butyrate stock should be kept in -80 fridge)
- Separate culture [4] and [6] into 4 tubes respectively, each containing 6mL of the culture.
- Mix different volume of butyrate into each culture, resulting in 4 different concentrations of butyrate ( 0, 10, 50 and 100 mM)
- At different time points ( 0, 4 and 24 hrs), take 2mL of each culture and centrifuge with 4500rpm for 5mins, then add 600uL M9 medium to resuspend the culture. (For it is difficult to measure the light absorbance with a low concentration of culture)
- Measure the light absorbance and OD then record.
- Plot a graph of the light absorbance over the concentration of butyrate.
Preparation of different concentration of butyrate culture
| Concentration (mM) | Culture (mL) | Butyrate (uL) |
|---|---|---|
| 0 | 6 | 0 |
| 10 | 6 | 60 |
| 50 | 6 | 300 |
| 100 | 6 | 600 |
Set the plate reader as follows
- Absorbance: 600nm
- Fluorescence: Excitation 485nm, Emission 515nm
Plate design
| 1 | 2 | 3 | 4 | 5 | 6 | 7 | 8 | 9 | 10 | 11 | 12 | |
|---|---|---|---|---|---|---|---|---|---|---|---|---|
| A | ||||||||||||
| B | M9 | Ecn | 1 | 4(0mM) | 4(10mM) | 4(50mM) | 4(100mM) | 6(0mM) | 6(10mM) | 6(50mM) | ||
| C | M9 | Ecn | 1 | 4(0mM) | 4(10mM) | 4(50mM) | 4(100mM) | 6(0mM) | 6(10mM) | 6(50mM) | ||
| D | M9 | Ecn | 1 | 4(0mM) | 4(10mM) | 4(50mM) | 4(100mM) | 6(0mM) | 6(10mM) | 6(50mM) | ||
| E | 6(100mM) | |||||||||||
| F | 6(100mM) | |||||||||||
| G | 6(100mM) | |||||||||||
| H |
( M9: negative control , Ecn: control , [1]: positive control )
Data Expected
Successful
In any given time,
[6]pET28a-pchA-PpchA-PLEE1-EGFP : will show a significant increase in fluorescence as butyrate concentration increases.
[4]pET28a-Lacl-Ppcha-Ptac-EGFP : will show a significant decrease in fluorescence as butyrate concentration increases.
Unsuccessful
No significant difference in fluorescence will be observed between different butyrate concentrations. Or in any given time,
[6]pET28a-pchA-PpchA-PLEE1-EGFP : will show a significant decrease in fluorescence as butyrate concentration increases.
[4]pET28a-Lacl-Ppcha-Ptac-EGFP : will show a significant increase in fluorescence as butyrate concentration increases.
Record 03 Plasmid Transformation of [4][6] into BL21 MaterialsMethod
Equipment
- [4]pET28a-Lacl-Ppcha-Ptac-EGFP
- [6]pET28a-pchA-PpchA-PLEE1-EGFP
- LB agar plate with Kanamycin
- LB agar plate with Ampicilin and Kanamycin
- Ice
- LB broth
- Competent cell (BL21)
Procedure
- Add 5 μl (total around 100ng) of plasmid [6] and 0.5 ul (total around 100ng)of plasmid [4] to the cells. Pipette gently. DO NOT vortex.
- Place mixture on ice for 20 minutes.
- Heat shock the mixture at 42°C for 1 minute.
- Place the mixture on ice for 2 minutes.
- Add 900μL of LB broth to the mixture. Pipette gently to mix.
- Incubate the mixture at 37°C for 1 hour. Shake at 300 rpm.
- Centrifuge at 4.5rpm for 5min.
- Remove 900uL supernatent and resuspend.
- Add 50μL of the mixture to each plate spread evenly.
- Collect the cells using centrifugation and remove 700μL of supernatent. Do not remove the cells.
- Pipette gently to mix. Add 100 μL of mixture to each plate (it is 4.5x concentration). Streak the plate.
- Incubate the plates overnight at 37°C. If it is not immediately used, store in 4°C refrigerator.
Record 04 Dynamic Test for Butyrate Concentration MaterialsMethod
Equipment
- [3]pET-T7-PTB-BUK + [5]pET28a-Lacl-Ppcha-PtaC-HBD-CRT-TER
- [3]pET-T7-PTB-BUK + [7]pET28a-T7-HBD-CRT-TER
- pET11a (control)
- LB broth
Procedure
- Collect samples at 24h.
- Take 1 mL of sample for a spectrophotometer, measure OD.
- If OD600 > 0.8, dilute with LB broth (not water) to stay within the linear range of the detector.
- Ultrasound.
- Centrifuge 3 mL of culture at 21,000 × g for 10 minutes at 4°C.
- Collect the supernatant.
- Store in a -20°C refrigerator.
Record 05 Plasmid Transformation of [3][7] into BL21 Method
- [3]pET-T7-PTB-BUK
- [7]pET28a-T7-HBD-CRT-TER
- LB agar plate with Kanamycin
- LB agar plate with Ampicilin
- Ice
- LB broth
- BL21 Competent cell
Procedure
- Add 1 μL of plasmid to the cells. Pipette gently. DO NOT vortex.
- Place mixture on ice for 20 minutes.
- Heat shock the mixture at 42°C for 1 minute.
- Place the mixture on ice for 2 minutes.
- Add 900μL of LB broth to the mixture. Pipette gently to mix.
- Incubate the mixture at 37°C for 1 hour. Shake at 300 rpm.
- Centrifuge at 4°C 4.5rpm for 5min
- Remove supernatant
- Resuspend cell pellet
- Add 50μL of mixture to 1 plates (50μL each). Spread evenly.
- Collect the cells using centrifugation and remove 700μL of LB. Do not remove the cells.
- Pipette gently to mix. Add 100 μL of mixture to each plate (it is 4.5x concentration). Streak the plate.
- Incubate the plates overnight at 37°C. If it is not immediately used, store in 4°C refrigerator.
Record 06 Fluorescence test [4][6] MaterialsMethod2 tables
Equipment
- [1]pET28a-Ptac-EGFP (positive control)
- [4]pET28a-Lacl-Ppcha-Ptac-EGFP
- [6]pET28a-pchA-PpchA-PLEE1-EGFP
- Control: ECN
- M9 minimal medium + 0.4% glucose (negative control)
- LB broth
- Sodium butyrate
- Iptg
- plasmids
Procedure
- Dilute the culture 1:75 into 25 mL of fresh M9 + 0.4% glucose
- Incubate at 37°C, 220 rpm. Measure OD600 until OD600 reaches 0.6–0.8.
- Prepare 1M butyrate stock by adding 6 mL ddH2O with 0.44g of butyrate powder. (Butyrate stock should be kept in -80 fridge)
- Separate culture [4] and [6] into 4 tubes respectively, each containing 4mL of the culture.
- Mix different volume of butyrate into each culture, resulting in 4 different concentrations of butyrate ( 0, 10, 20 and 50 mM)
- At different time points ( 4 and 24 hrs), take 2mL of each culture and centrifuge with 4500rpm for 5mins, then add 600uL M9 medium to resuspend the culture. (For it is difficult to measure the light absorbance with a low concentration of culture)
- Measure the light absorbance and OD then record.
- Plot a graph of the light absorbance over the concentration of butyrate.
Preparation of different concentration of butyrate culture
| Concentration (mM) | Culture (mL) | Butyrate (uL) |
|---|---|---|
| 0 | 4 | 0 |
| 10 | 4 | 40 |
| 20 | 4 | 80 |
| 50 | 4 | 200 |
Set the plate reader as follows
- Absorbance: 600nm
- Fluorescence: Excitation 485nm, Emission 515nm
Plate design
| 1 | 2 | 3 | 4 | 5 | 6 | 7 | 8 | 9 | 10 | 11 | 12 | |
|---|---|---|---|---|---|---|---|---|---|---|---|---|
| A | ||||||||||||
| B | M9 | BL21 | 1 | 4(0mM) | 4(10mM) | 4(20mM) | 4(50mM) | 6(0mM) | 6(10mM) | 6(20mM) | ||
| C | M9 | BL21 | 1 | 4(0mM) | 4(10mM) | 4(20mM) | 4(50mM) | 6(0mM) | 6(10mM) | 6(20mM) | ||
| D | M9 | BL21 | 1 | 4(0mM) | 4(10mM) | 4(20mM) | 4(50mM) | 6(0mM) | 6(10mM) | 6(20mM) | ||
| E | 6(50mM) | |||||||||||
| F | 6(50mM) | |||||||||||
| G | 6(100mM) | |||||||||||
| H |
( M9: negative control , Ecn: control , [1]: positive control )
Data Expected
Successful
In any given time,
[6]pET28a-pchA-PpchA-PLEE1-EGFP : will show a significant increase in fluorescence as butyrate concentration increases.
[4]pET28a-Lacl-Ppcha-Ptac-EGFP : will show a significant decrease in fluorescence as butyrate concentration increases.
Unsuccessful
No significant difference in fluorescence will be observed between different butyrate concentrations. Or in any given time,
[6]pET28a-pchA-PpchA-PLEE1-EGFP : will show a significant decrease in fluorescence as butyrate concentration increases.
[4]pET28a-Lacl-Ppcha-Ptac-EGFP : will show a significant increase in fluorescence as butyrate concentration increases.
Record 07 Neuronal cell lines: tau-WT & EGFP-tau-P301L passaging MaterialsMethod
Equipment
- 15mL tau-WT culture
- 15mL EGFP-tau-P301L culture
- 0.05% Trypsin-EDTA
- DMEM
Procedure
- Discard the medium from cell culture.
- Add 3mL 0.05% Trypsin-EDTA to each cell culture. Gently shake.
- Place in a 37C 5%CO2 incubator for 1 minute.
- Add 3mL DMEM to each culture to stop digesting.
- Resuspend gently to ensure all adhering cells are digested.
- Centrifuge at 1000 rpm for 3 minutes.
- Discard the supernatant.
- Dilute the cells with DMEM in an 1:6(WT) and 1:4(EGFP) proportion as WT cells are way more than expected.
- Add 500 uL suspension to each flask and fill up to 15mL.
- Place in a 37C 5%CO2 incubator. Keep an eye on cell growth.
Record 08 Bacterial survival test MaterialsMethod
Equipment
- pET-T7-PTB-BUK
- pET28a-Lacl-Ppcha-PtaC-HBD-CRT-TER
- EcN
- Centrifuge
- PBS
- LB broth
- Simulated intestinal fluid
- Polystyrene tubes
- Antibiotic
- Anaerobic bag
- Incubator
Procedure
- Divide [3]pET-T7-PTB-BUK+[5]pET28a-Lacl-Ppcha-PtaC-HBD-CRT-TER and EcN each into three portions and centrifuge them at 4500 rpm for 15 minutes.
- Discard the supernatant.
- Resuspend the bacterial pellet in the three portions in 1 mL PBS, LB broth, and simulated intestinal fluid, respectively.
- Prepare six polystyrene tubes.
- For two of the tubes, add 4 mL PBS and 1 bacterial sample, with the corresponding antibiotic.
- For two of the flasks, add 13 mL LB broth and 1 mL bacterial sample, with the corresponding antibiotic.
- For the two polystyrene tubes, add 5 mL simulated intestinal fluid and 0.4 mL the bacterial sample, with the corresponding antibiotic, and seal the tubes in an anaerobic bag.
- Incubate the samples at 220 rpm, 37℃ overnight.
Record 09 Butyric Acid ELISA Kit (for HPLC Test2) MaterialsMethod
Equipment
- Butyrate Elisa kit
- pET11a 0mM, 10mM, 20mM
- [3]+[7] 0mM, 10mM, 20mM
- [3]+[5] 0mM, 10mM, 20mM
Procedure
Preparation of Standard
- Prepare the Standard with 1.0 ml of Standard Diluent buffer to make the 30 ng/ml Standard Solution.
- Allow the reconstituted standard to sit for 10 mins.
- Further dilute by a factor of 3 to give the highest standard, 10ng/ml.
- Aliquot 0.6 ml of the Standard Diluent Buffer into each tube (apart from the highest standard tube)
- Add 0.3 ml of the highest standard solution into the 1st tube and mix thoroughly.
- Transfer 0.3 ml from the 1st to 2nd tube, mix thoroughly, and so on.
Preparation of Wash Buffer
- Dilute the concentrated Wash Buffer 30-fold (1/30) with distilled water.
Preparation of Reagent A Working Solution
- Dilute Detection Reagent A 100-fold with Diluent A, and mix thoroughly.
Preparation of Reagent B Working Solution
- Dilute Detection Reagent B 100-fold with Diluent A, and mix thoroughly.
Procedure
- Set standard, test sample and control (zero) wells on the pre-coated plate respectively, and record their positions. Add the solution to the bottom of each well without touching the side walls. Pipette the standards and samples up and down to mix before adding to the wells. Avoid foaming or bubbles.
- Aliquot 50 μl of the diluted standards into the standard wells.
- Aliquot 50 μl of Standard Diluent buffer into the control (zero) well.
- Aliquot 50 μl of appropriately diluted sample into the test sample wells. Gently tap the plate to mix, or use a microplate shaker.
- Immediately aliquot 50 μl of Detection Reagent A working solution to each well. Gently tap the plate to mix, or use a microplate shaker. Cover the plate with a plate sealer and incubate for 1 hr at 37℃.
- Remove the cover and discard the solution. Wash the plate 3 times with 1X Wash Buffer. Fill each well completely with Wash buffer (350 μl) using a multi-channel Pipette or autowasher (1-2 mins soaking period is recommended). Complete removal of liquid at each step is essential for good performance. After the final wash, remove any remaining Wash Buffer by aspirating or decanting. Invert the plate and blot it against clean absorbent paper towels.
- Aliquot 100 μl of Detection Reagent B working solution to each well. Seal the plate and incubate for 30 mins at 37°.
- Remove the cover, discard the solution and repeat the wash process as described above, 5 times.
- Aliquot 90 μl of TMB Substrate into each well. Cover the plate with the plate sealer. Gently tap the plate to mix thoroughly. Incubate at 37°C for 10-20 minutes. The incubation time is for reference only, the optimal time should be determined by end user. Avoid exposure to light.
- Aliquot 50 μl of Stop Solution into each well. It is important that the Stop Solution is mixed quickly and uniformly throughout the microplate to inactivate the enzyme completely.
- Measure the OD at 450 mm immediately.
Record 10 Neuronal cell lines: Tau-EGFP-WT & EGFP-tau-P301L seed plate MaterialsMethod
Equipment
- 15mL tau-WT culture
- 15mL EGFP-tau-P301L culture
- 0.05% Trypsin-EDTA
- DMEM
Procedure
- Discard the medium from cell culture.
- Add 3mL 0.05% Trypsin-EDTA to each cell culture. Gently shake.
- Place in a 37C 5%CO2 incubator for 1 minute.
- Add 3mL DMEM to each culture to stop digesting.
- Resuspend gently to ensure all adhering cells are digested.
- Centrifuge at 1000 rpm for 3 minutes.
- Discard the supernatant.
- Dilute the cells with DMEM in a 1:6 proportion.
- Add 1mL DMEM to 3 wells in two 24 well plate labelled WT and P301L.
- Add 20 uL suspension to each well and fill up to 15mL.
- Place in a 37C 5%CO2 incubator for 24 hours.
Record 11 Neuronal cell lines: Tau-EGFP-WT & EGFP-tau-P301L add butyrate MaterialsMethod
Equipment
- Cell culture in 24 well plate.
- Butyrate DMEM medium
Procedure
- Prepare 0, 30uM, 300uM sodium butyrate DMEM.
- Pipette medium from one 24 well plate.
- Add 1mL 0, 30uM, 300uM sodium butyrate DMEM into each 3 wells
- Pipette medium from another 24 well plate.
- Add 1mL 0, 30uM, 300uM sodium butyrate DMEM into each 3 wells
- Place in a 37C 5%CO2 incubator for 24 hours.